admin@unaz.net
+92 333 1333443
Overview
This examination implements a unique methodology for evaluating students, incorporating modules such as terms,
observation, observation parameters, assessment, marksheet templates, subject marks reports, and template marks reports.
یہ امتحان طلباء کی تشخیصکے لیے ایک منفرد طریقہ کار کو لاگو کرتا ہے، ماڈیولز جیسے اصطلاحات، مشاہدہ، مشاہداتی پیرامیٹرز، اسسمنٹ، مارک شیٹ ٹیمپلیٹس، سبجیکٹ
یے ایک منفرد طریقہ کار کو لاگو کرتا ہے، ماڈیولز جیسے اصطلاحات، مشاہدہ، مشاہداتی پیرامیٹرز، اسسمنٹ، مارک شیٹ ٹیمپلیٹس، سبجیکٹ
مارکس رپورٹس، اور ٹیمپلیٹ مارکس رپورٹس کو شامل کرتا ہے۔
Detailed Introduction:
This examination implements a unique methodology for evaluating students, incorporating modules such as terms,
observation, observation parameters, assessment, marksheet templates, subject marks reports, and template marks reports.
The system offers the flexibility to establish multiple terms for various examinations, all of which can be seamlessly integrated
into the marksheet. There are no constraints on the number of terms that can be generated within a single academic year.
Assessment assumes a pivotal role in gauging students' comprehension, proficiency, and overall development across subjects.
It aims to furnish a well-rounded evaluation encompassing both theoretical knowledge and practical aptitude.
Central to the examination process is the role of observation, which underpins the integrity and credibility of assessments. By
fostering transparency and accountability, observation fosters a trustworthy evaluation framework for students.
Observation parameters delineate the specific criteria and facets monitored and evaluated by external observers during
examinations, ensuring a thorough and fair assessment process.
یہ امتحان طلباء کی تشخیص کے لیے ایک منفرد طریقہ کار کو لاگو کرتا ہے، ماڈیولز جیسے اصطلاحات، مشاہدہ، مشاہداتی پیرامیٹرز، اسسمنٹ، مارک شیٹ ٹیمپلیٹس، سبجیکٹ
مارکس رپورٹس، اور ٹیمپلیٹ مارکس رپورٹس کو شامل کرتا ہے۔
یہ نظام مختلف امتحانات کے لیے متعدد شرائط قائم کرنے کی لچک پیش کرتا ہے، جن میں سے سبھی کو بغیر کسی رکاوٹ کے مارک شیٹ میں ضم کیا جا سکتا ہے۔ شرائط کی
تعداد پر کوئی پابندی نہیں ہے جو ایک تعلیمی سال کے اندر تیار کی جا سکتی ہیں۔
تشخیص طلباء کی فہم، مہارت، اور تمام مضامین میں مجموعی ترقی کا اندازہ لگانے میں ایک اہم کردار ادا کرتا ہے۔ اس کا مقصد نظریاتی علم اور عملی اہلیت دونوں پر مشتمل ایک
اچھی طرح سے تشخیص پیش کرنا ہے۔
امتحان کے عمل کا مرکز مشاہدے کا کردار ہے، جو جائزوں کی دیانت اور اعتبار کی بنیاد رکھتا ہے۔ شفافیت اور جوابدهی کو فروغ دے کر، مشاہدہ طلباء کے لیے قابل اعتماد
تشخیصی فریم ورک کو فروغ دیتا ہے۔
مشاہدے کے پیرامیٹرز امتحانات کے دوران بیرونی مبصرین کے ذریعہ نگرانی اور جانچ کے مخصوص معیار اور پہلوؤں کی وضاحت کرتے ہیں، ایک مکمل اور منصفانہ تشخیص
کے عمل کو یقینی بناتے ہیں۔
Steps to conduct an Exam from A to Z:
1. Create the term.
2. Create the exam grade for the examination.
3. Create the assessments.
4. Before creating observations, establish the observation parameters.
5. Create the observations.
6. Assign the observations and link the marks to them.
7. Create the exam and assign it to the students.
8. Enter the subjects and their respective marks.
9. Record the attendance and teacher remarks.
10. To publish an exam, you need to edit the exam and check the checkbox of the published exam.
11. To publish the result, you need to edit the exam and check the checkbox of the published result.
12. To print the mark sheet, create the template first.
13. Link the exam with the template.
14. Now, you can print the mark sheet.
15. To check the result on the student side, login to the student panel, go to CBSE Examination > Exam Result.
1. Create Term:
Click Examination in the Main Menu and Select TB Exam Management:
1. Click on Settings.
2. Click on Terms.
3. Click on Add Term Blue Button in the right top corner.
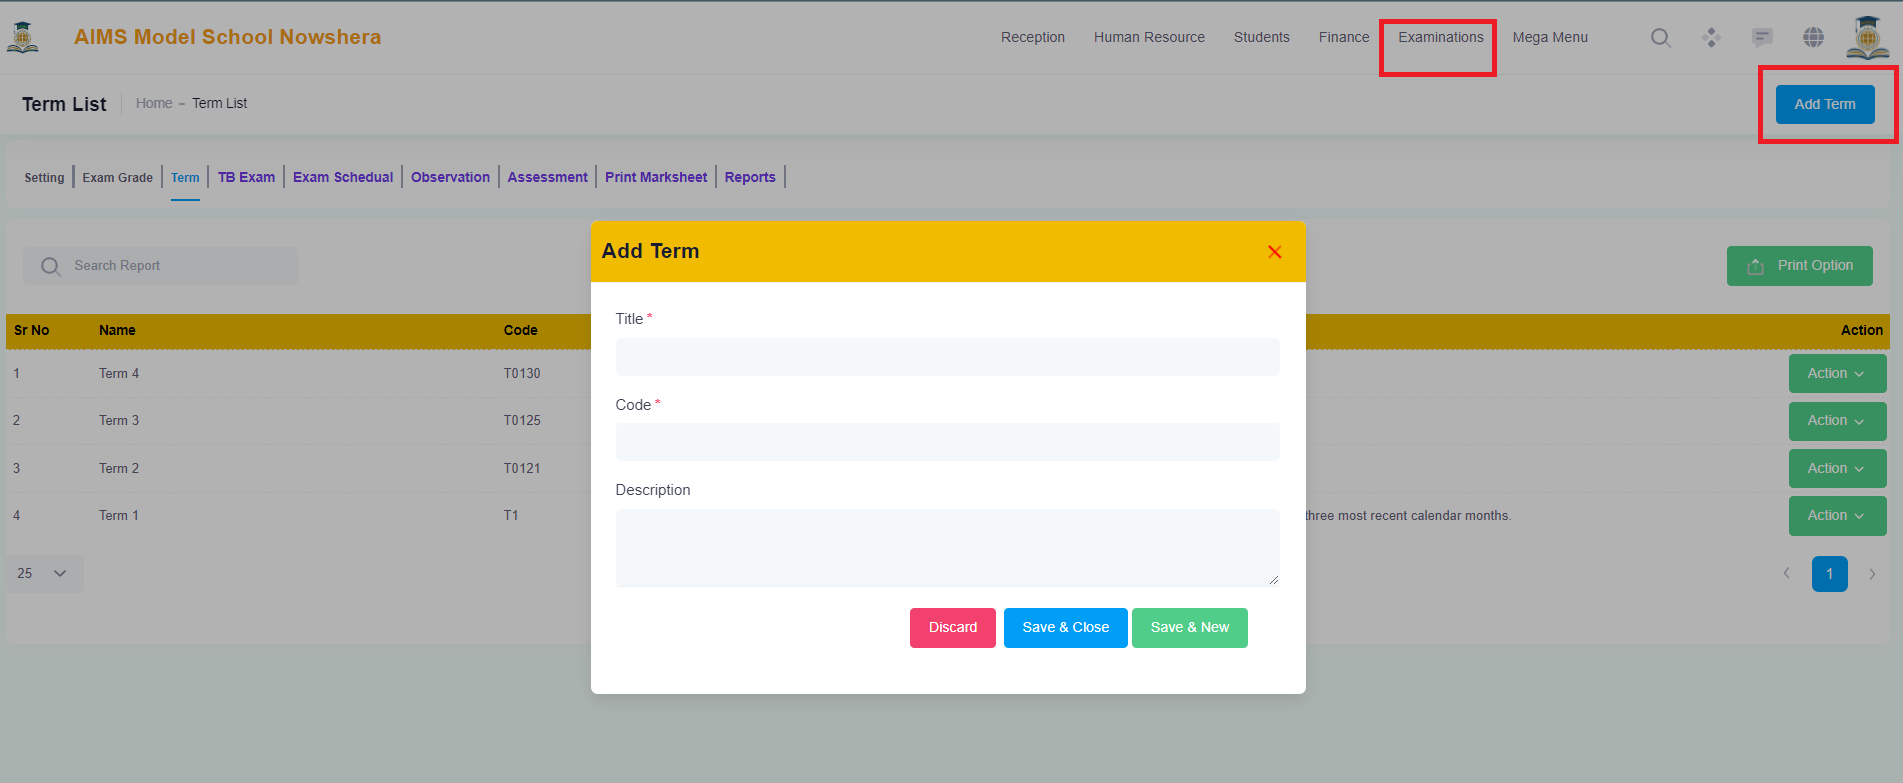
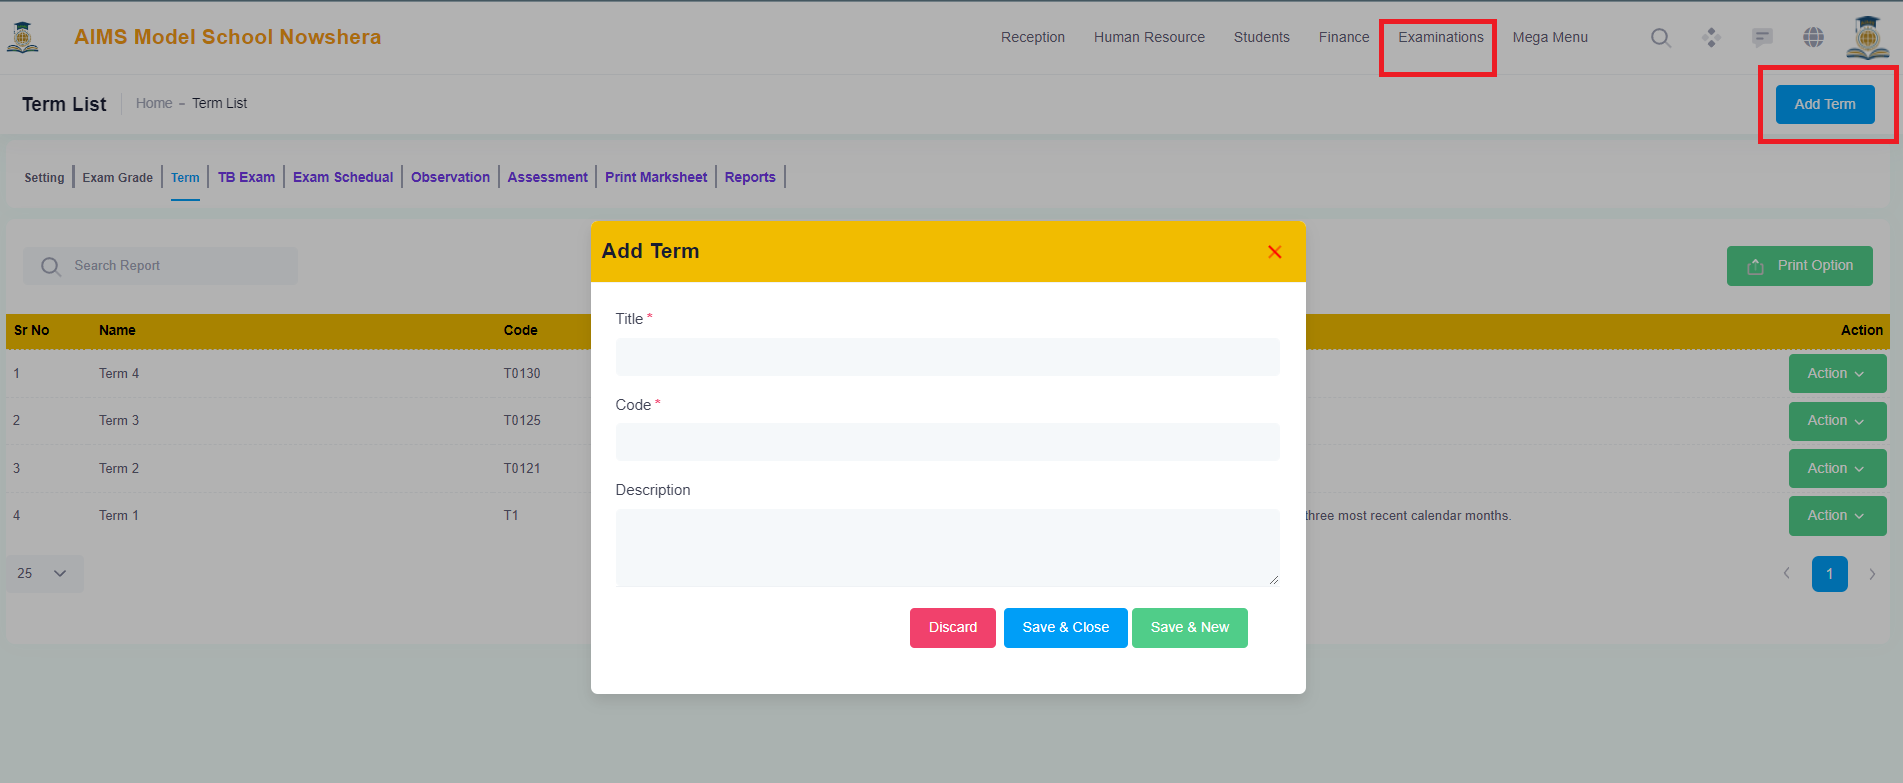
Add the Term in the Model on the screen and you will see that added term in the listing.
Terms can be edited or deleted from the actions green button in the listing.
2. Create the exam grade for the examination:
Click Examination in the Main Menu and Select TB Exam Management:
1. Click on Settings.
2. Click on Exam Grades.
3. Click on Add Exam Grades Blue Button in the right top corner.
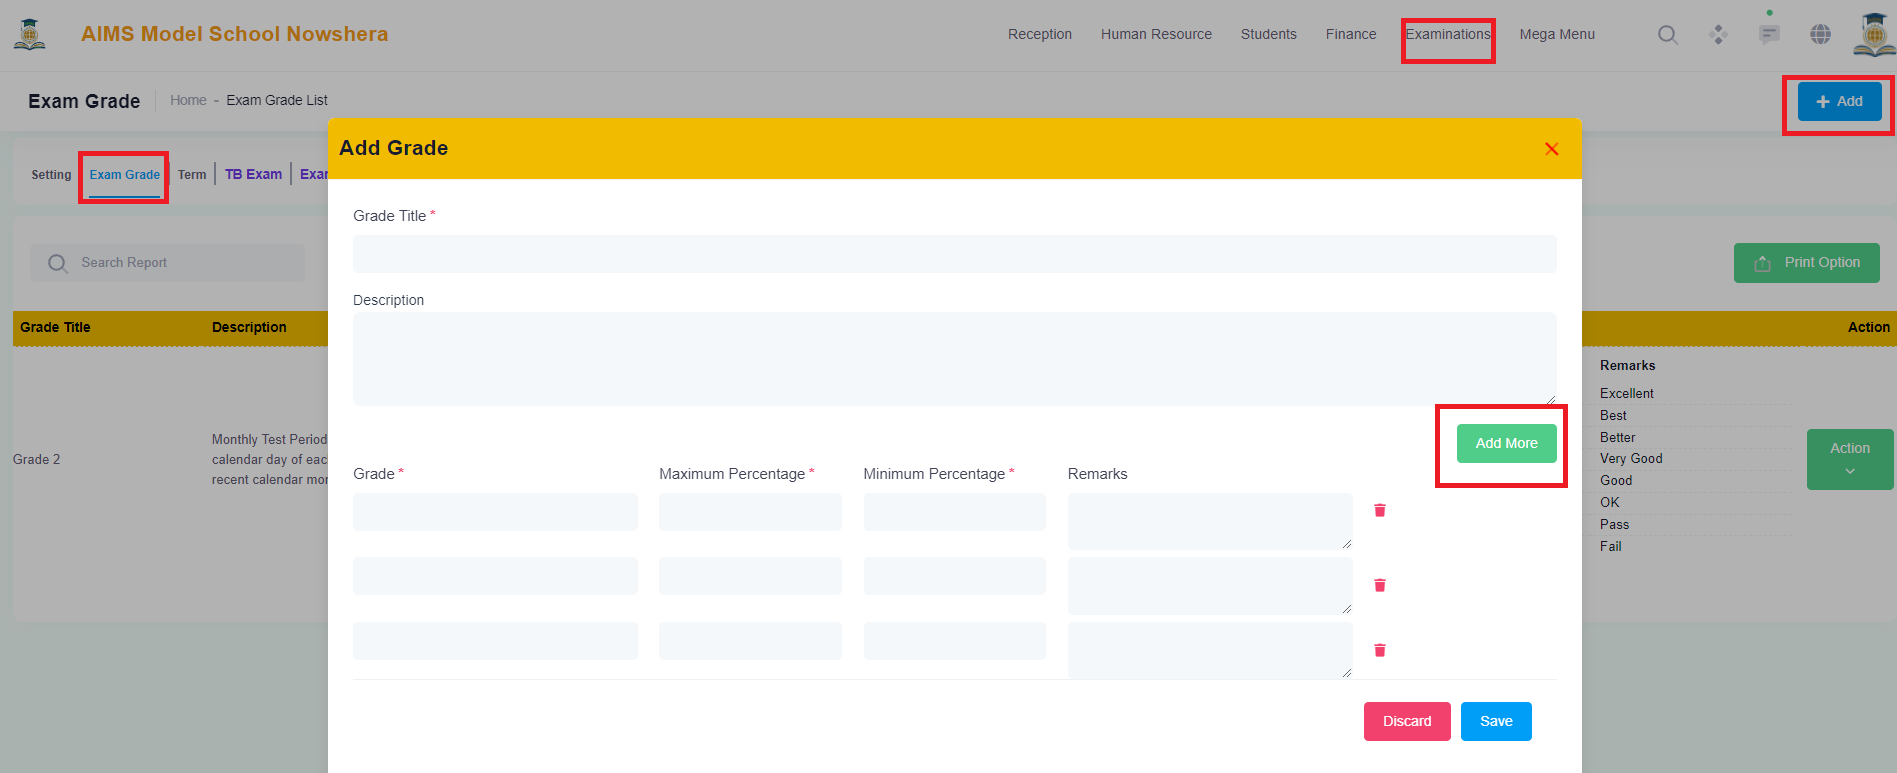
4. More grades can be added while clicking on the Add More Button.
Add the Exam Grades in the Model on the screen and you will see that added Exam Grades in the listing.
Exam Grades can be edited or deleted from the actions green button in the listing.

3. Create the Assessments:
Click Examination in the Main Menu and Select Assessment Management:
1. Click on Add Assessments Blue Button in the right top corner.
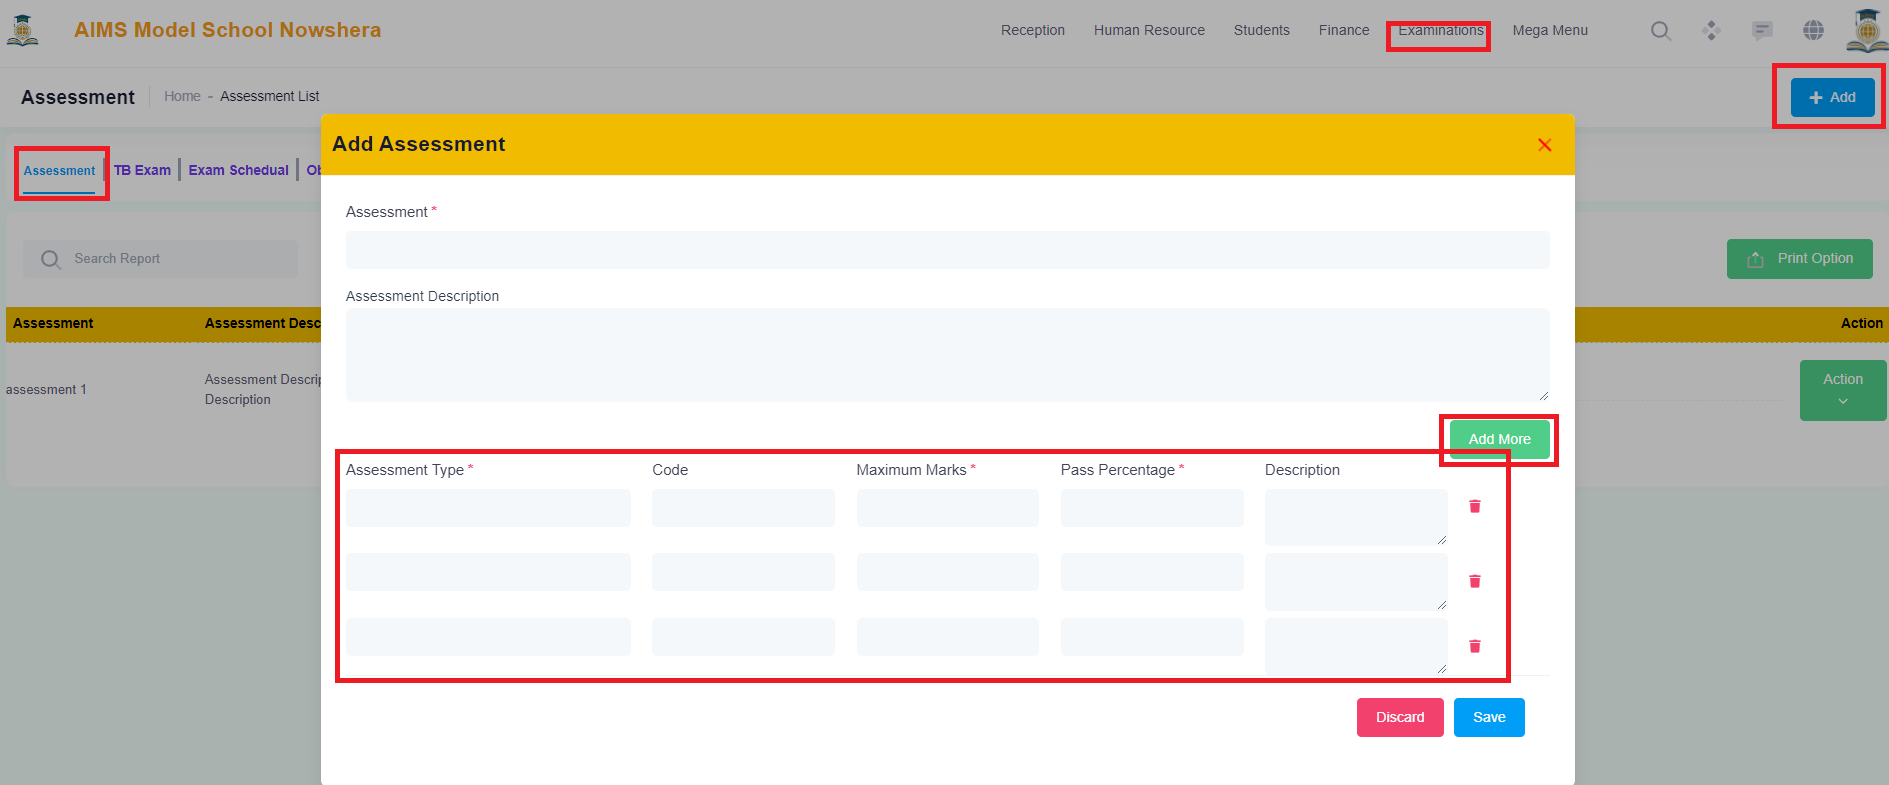
2. More Assessment Types can be added while clicking on the Add More Button.
3. Add Assessment Type, Code, Maximum Marks, Minimum Marks and Description in the model and you will see the added assessment in the listings.

Assessments can be edited or deleted from the actions green button in the listing.
4. Observation Management:
Click Examination in the Main Menu and Select Observation Management:
4.1 Observation Parameters:
1. First you will need to create Observation Parameters.
2. Click on Add Observation Parameter Blue Button in the right top corner.
3. Create the Observation Parameter by entering data in the Model.
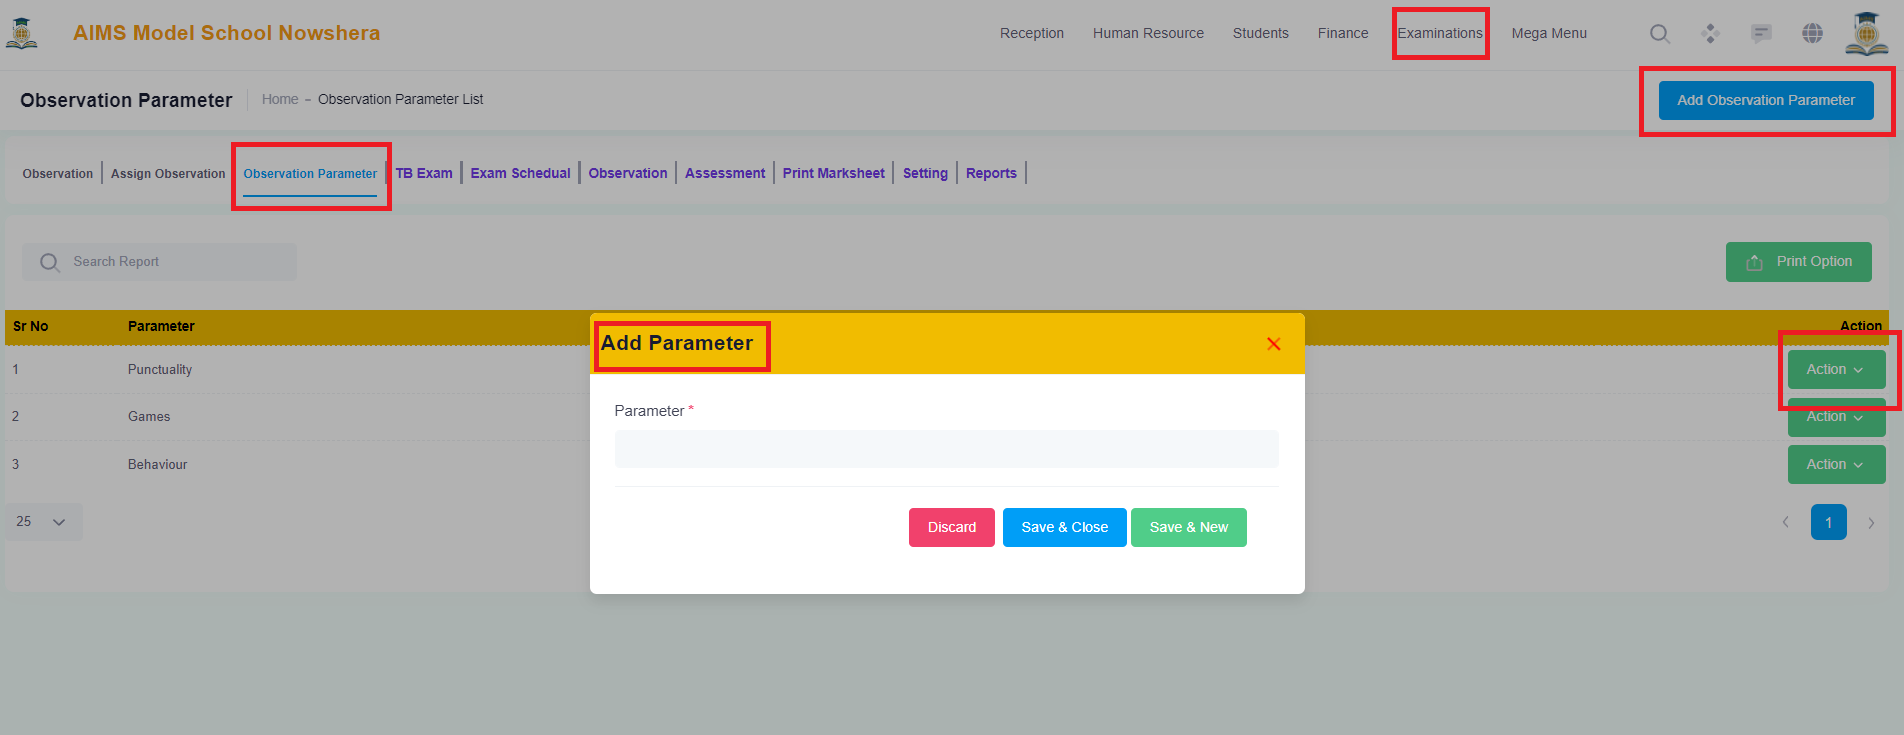
Observation Parameters can be edited or deleted from the actions green button in the listing.
4.2 Create Observation:
1. 2nd you will need to create an Observation.
2. Click on Add Observation Blue Button in the right top corner.
3. Create the Observation by entering data in the Model.
4. More Observations can be added while clicking on the Add More Button.
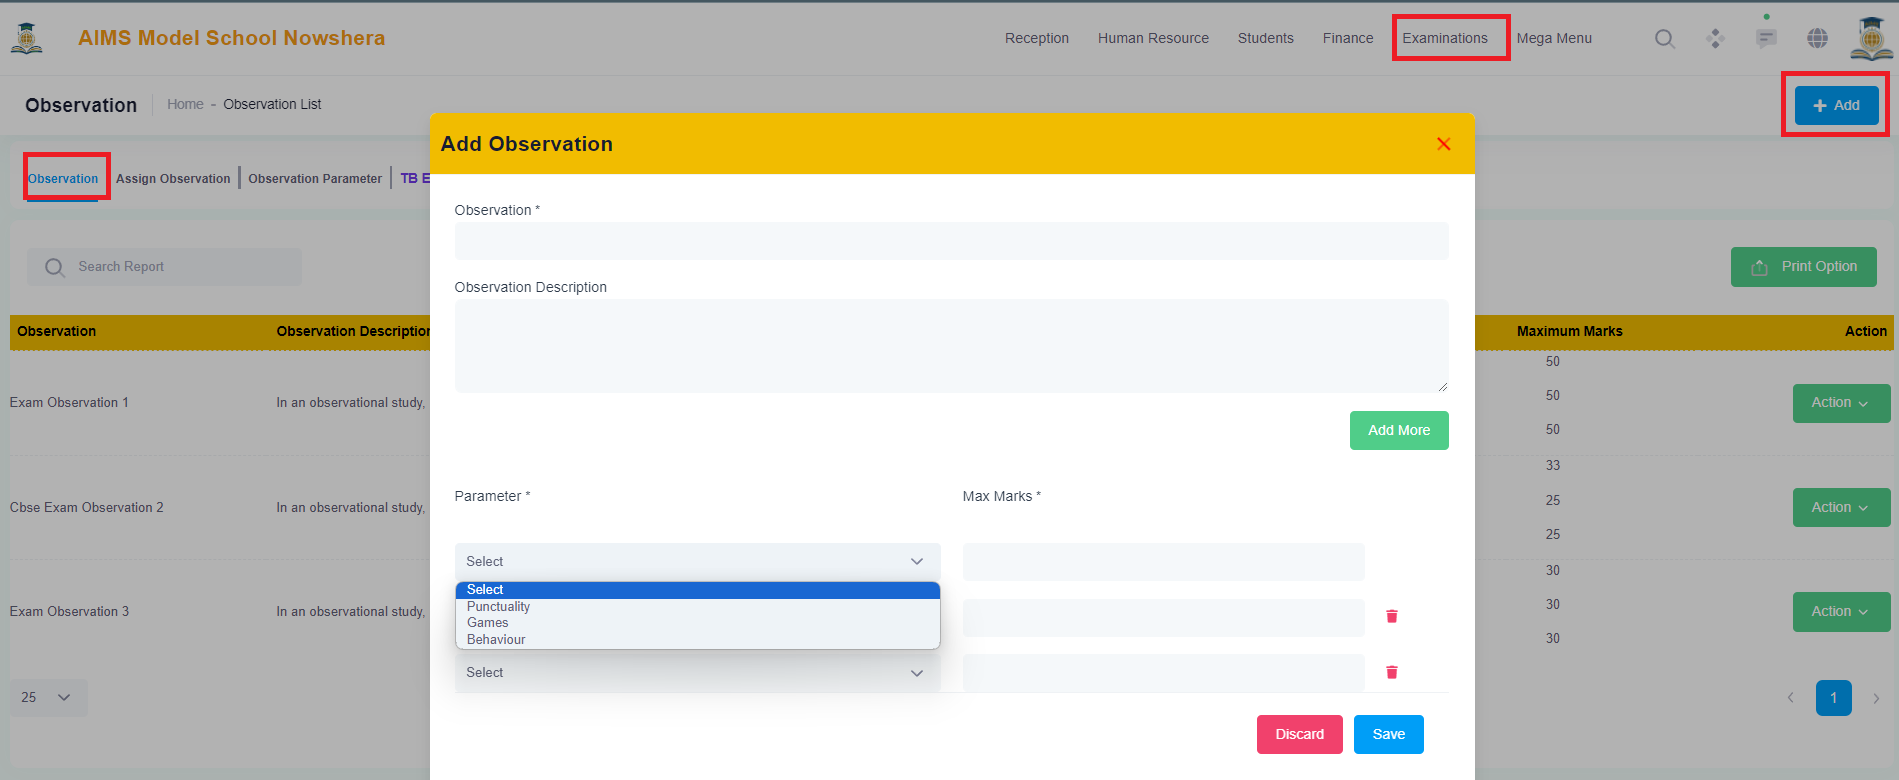
Observations can be edited or deleted from the actions green button in the listing.
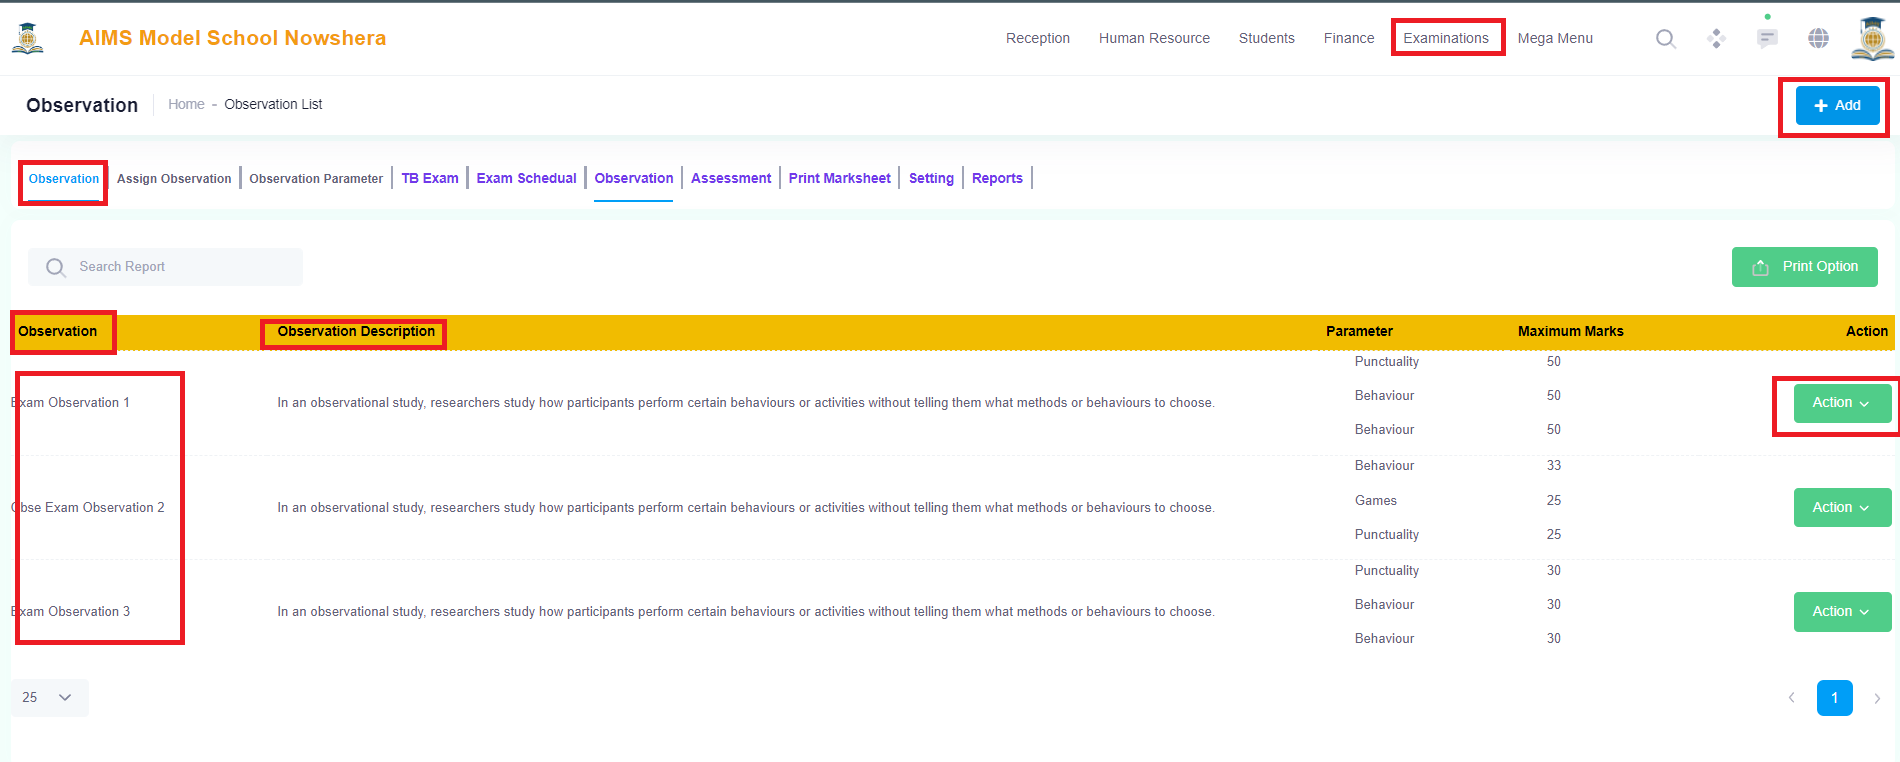
4.3 Assign Observation:
1. 3rd you will need to create an Observation to assign to students.
2. Click on Add Observation Blue Button in the right top corner.
3. Create the Observation Term by entering data in the Model.
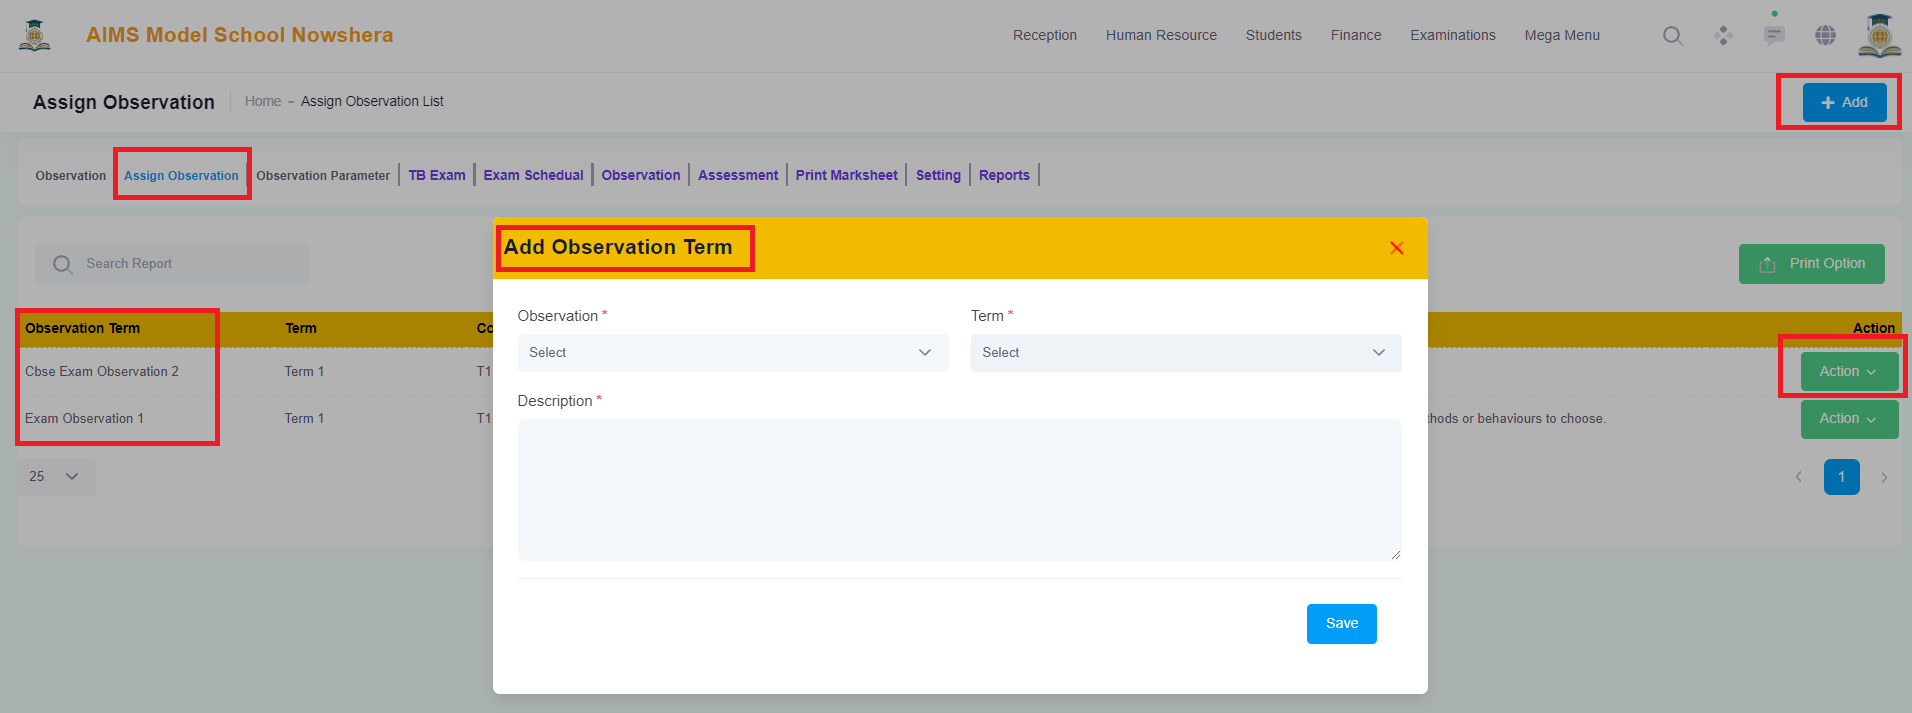
Observations Terms can be edited or deleted from the actions green button in the listing.
After creating the Observation Terms, Click on the Actions Button to Assign this observation term to any particular Class - Section or Students.

Assign Marks:
When you click on the Assign Marks in the Actions Tab, The following screen will appear to assign marks.
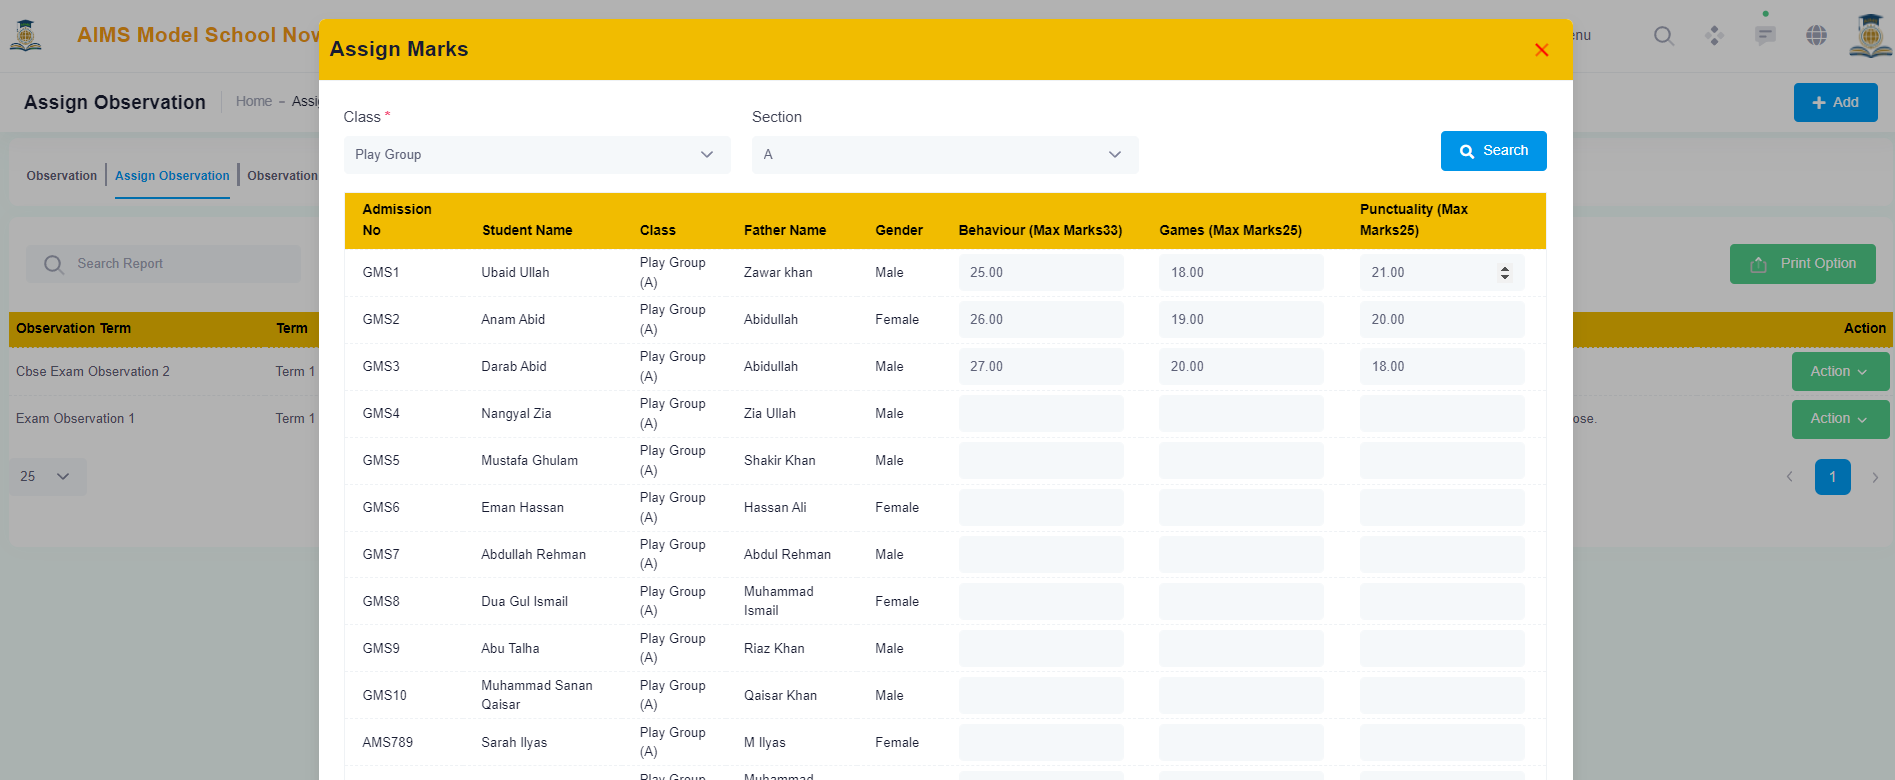
The Assigned Marks can be edited by opening the same class and section from the same action button. The Same Observation Term Marks can be assigned to any class and section of the Institution.
These are the first important steps to be taken before creating an examination.
Now we are going to create a Term Base Examination and all the steps are explained below.
5. Create TB Exam:
Click Examination in the Main Menu and Select TB Exam Management:
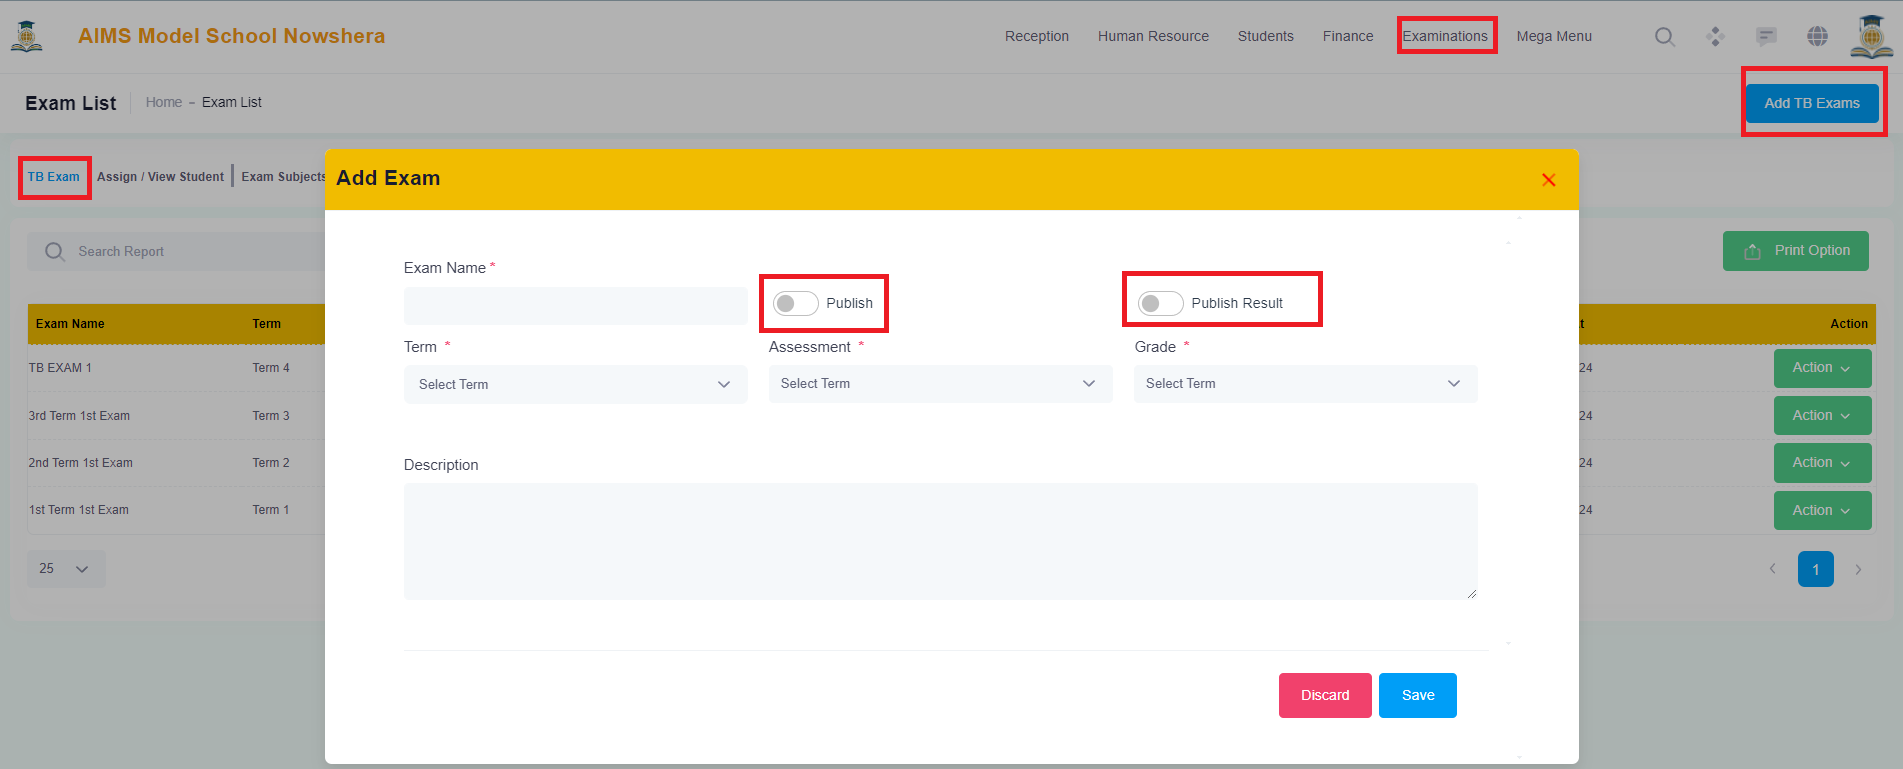
1. Click on Add TB Exam Blue Button in the right top corner.
2. Add Exam Name,
2.1 Check if you want to Publish,
2.2 Check If you want to publish result on the Front Side,
2.3 Select Term,
2.4 Select Assessment, and
2.5 Select Grades and
2.6 Description in the model and you will see the added assessment in the listings.
TB Exam can be edited or deleted from the actions green button in the listing.
TB Exam Listings:

6. Assign / View Students:
Click Examination in the Main Menu and Select TB Exam Management:
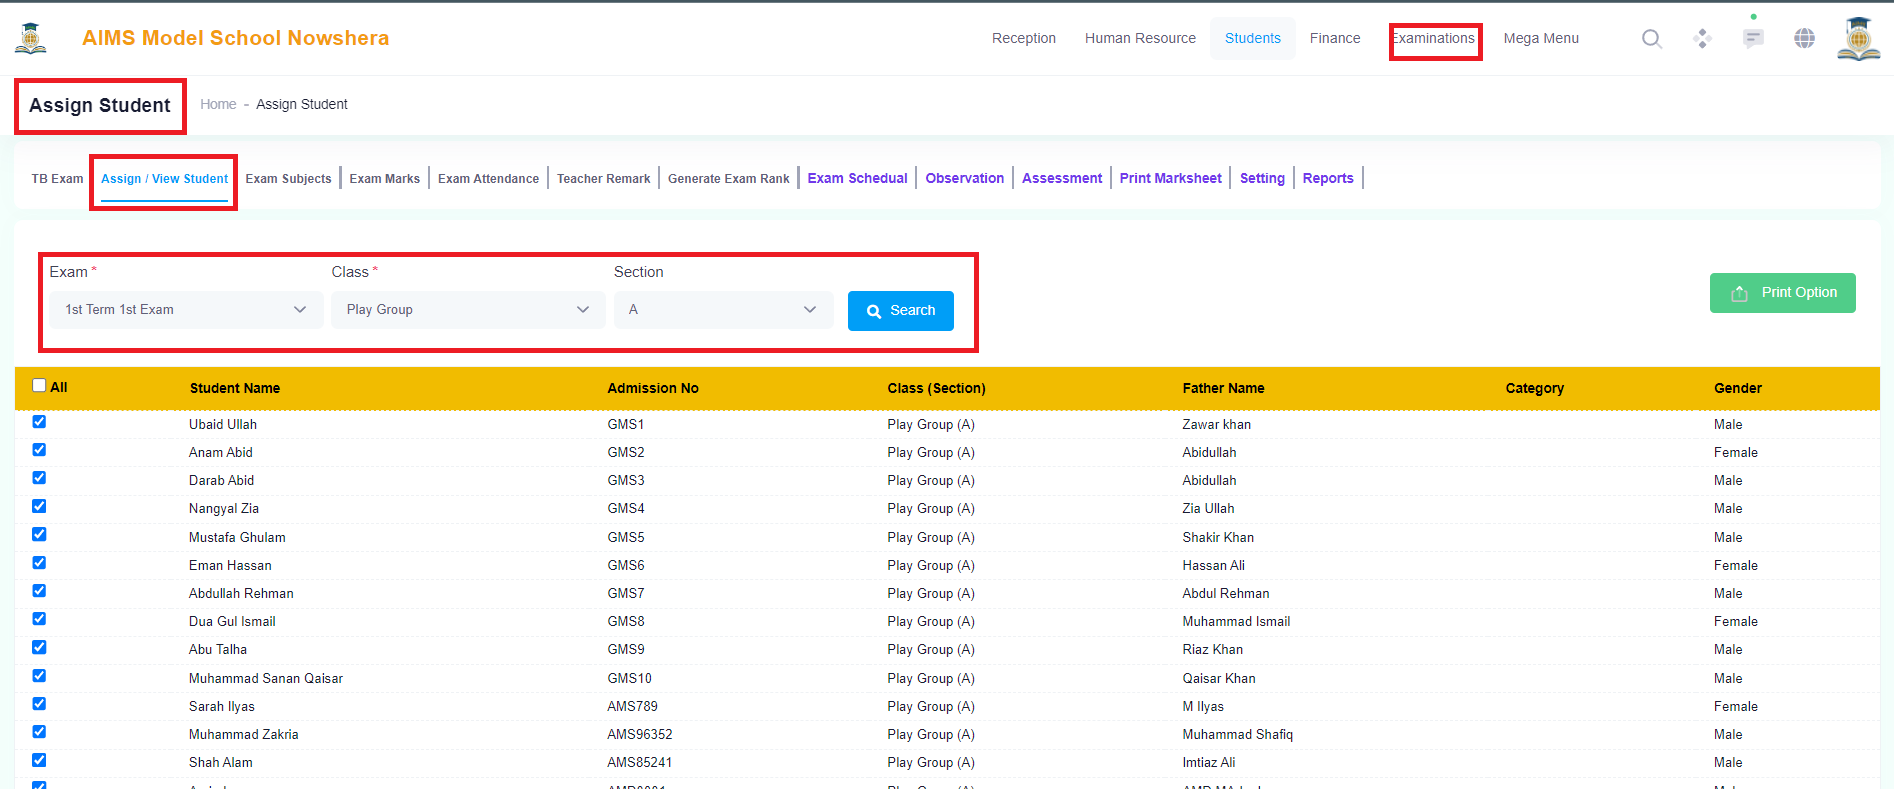
1. Click on Assign / View Tab to Assign TB Exam to the students of a particular Class and Section..
2. Select Exam from Drop Down,
3. Select Class,
4. Select Section,
5. Select Students from List or Select All,
6. Click on the Assign Blue Button in the bottom,
Now the Exam has been successfully Assigned to the selected students.
7. Exam Subjects:
Click Examination in the Main Menu and Select TB Exam Management:
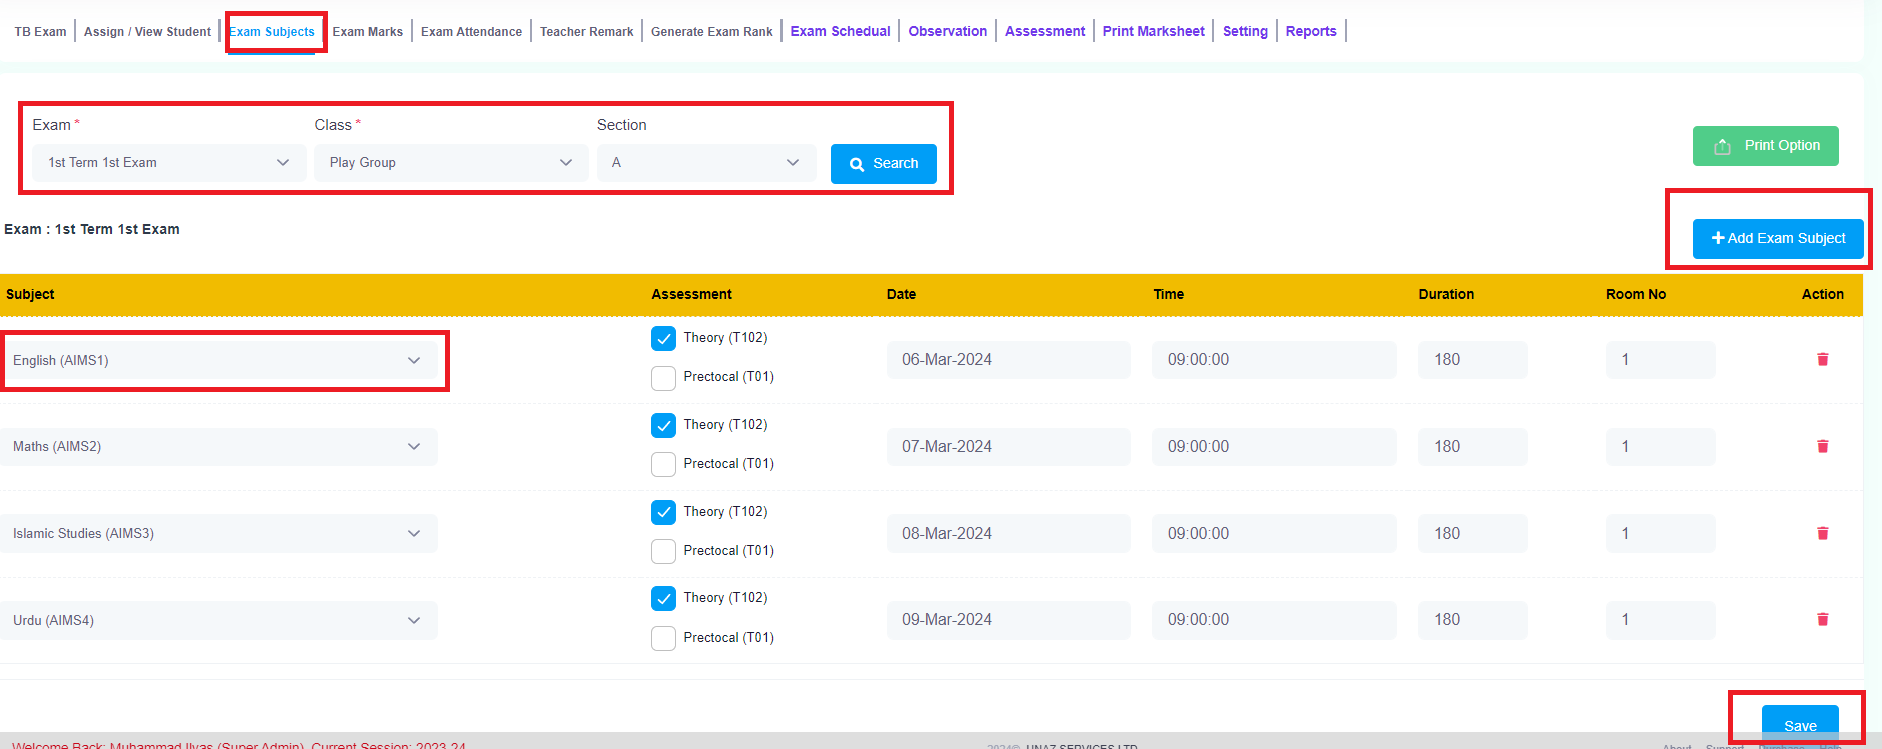
1. Click on Exam Subjects Tab to Add TB Exam Subjects to the students of a particular Class and Section..
2. Select Exam from Drop Down,
3. Select Class,
4. Select Section,
5. Click on the Add Subjects Blue Button to Add Subjects,
6. Select Subject from Drop Down,
7. Select Theory / Practical or Assessment (Added in Assessment)
8. Select Date,
9. Enter Paper Start Timing,
10. Enter Paper duration in Minutes,
11. Enter Room / Hall Number
12. Click on Save Button to Save the Exam Schedule.
8. Exam Marks:
Click Examination in the Main Menu and Select TB Exam Management:
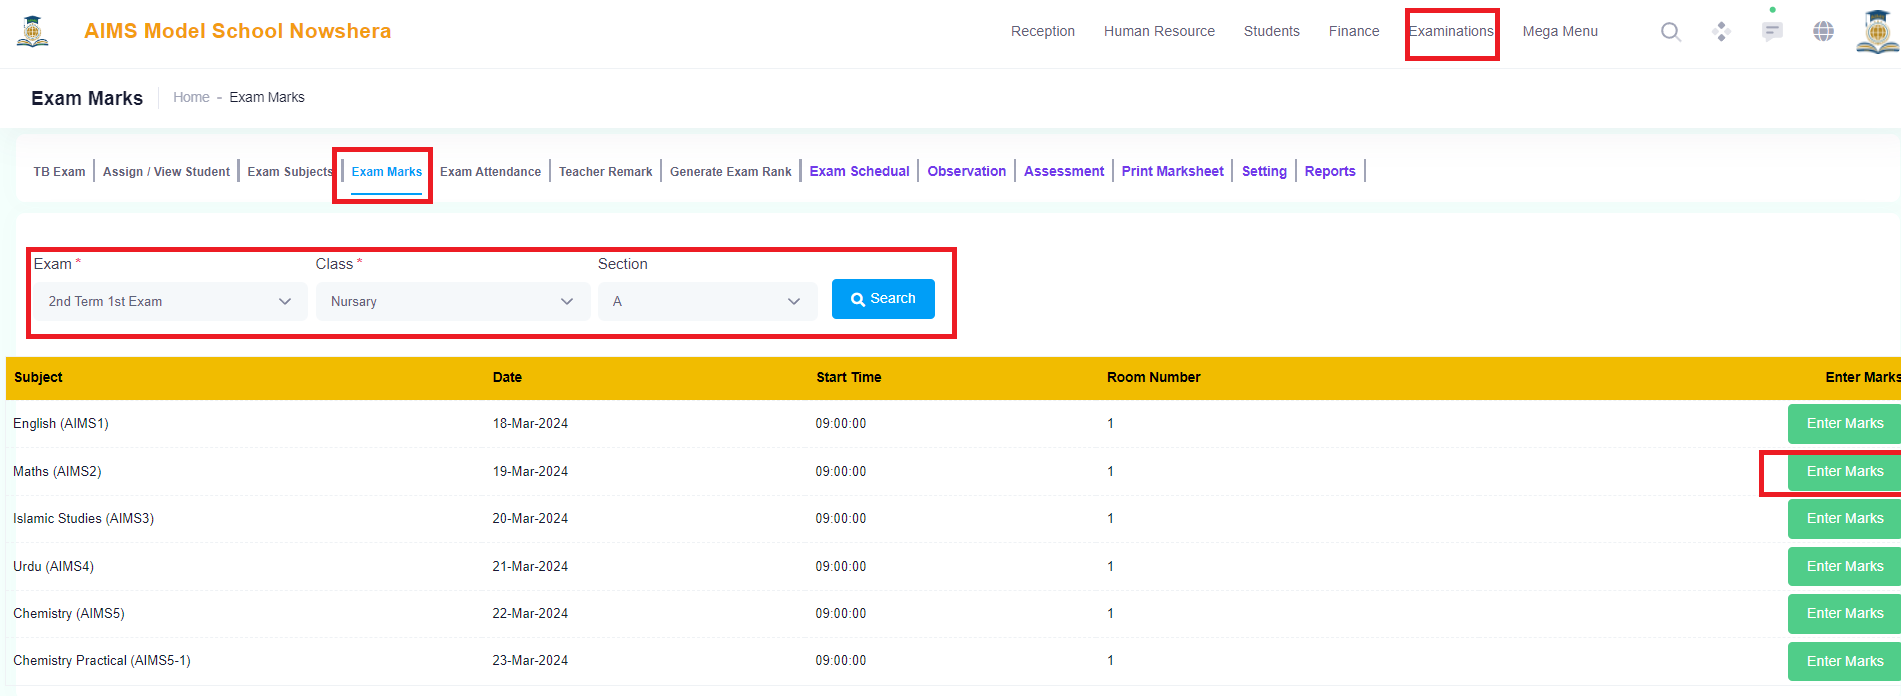
1. Click on Exam Marks Tab to Add TB Exam Marks to the students of a particular Class and Section..
2. Select Exam from Drop Down,
3. Select Class,
4. Select Section, (Click Search Button and All the Assigned Subject will appear, Then Click on the Green Enter Marks Button in each line to enter marks).
Now Exam Subject Marks can be entered in the following shown image.
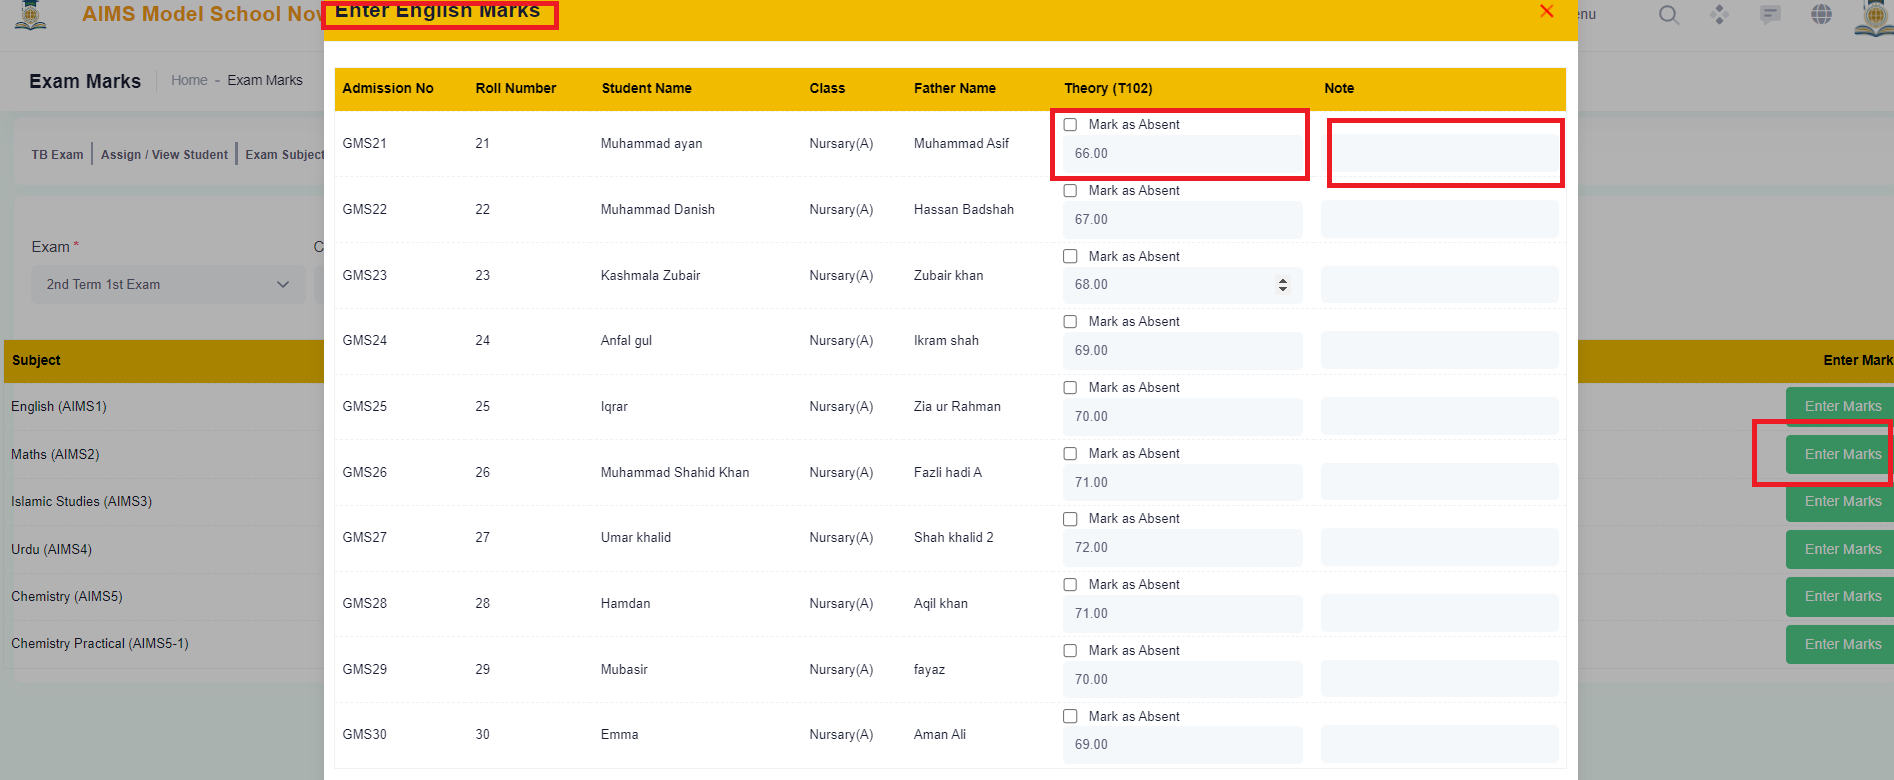
Click on the Blue Save Button to save the entered Marks.
9. Exam Attendance:
Click Examination in the Main Menu and Select TB Exam Management:
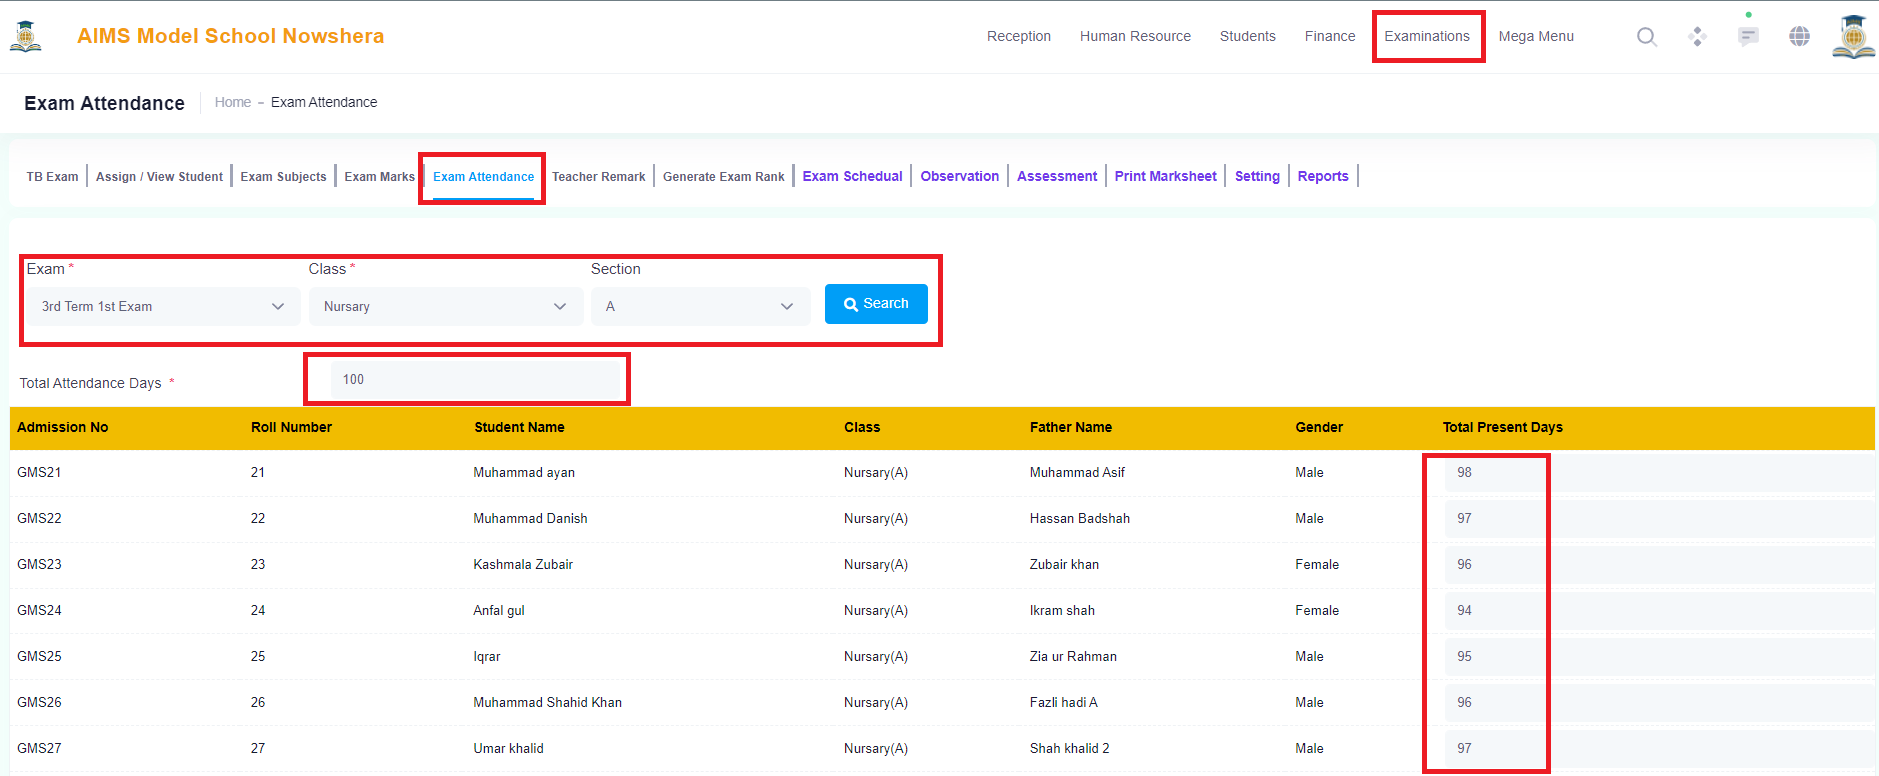
1. Click on Exam Attendance Tab to Add TB Exam Attendance to the students of a particular Class and Section..
2. Select Exam from Drop Down,
3. Select Class,
4. Select Section, (Click Search Button and All the Assigned students list will appear, Then enter the Total Attendance Days and enter individual student attendance in the relevant field).
5. Click on the Blue Save Button in the bottom to save the attendance.
6. The Entered Attendance will be shown in the Student Exam Report Card accordingly.
10.Teacher Remarks:
Click Examination in the Main Menu and Select TB Exam Management:
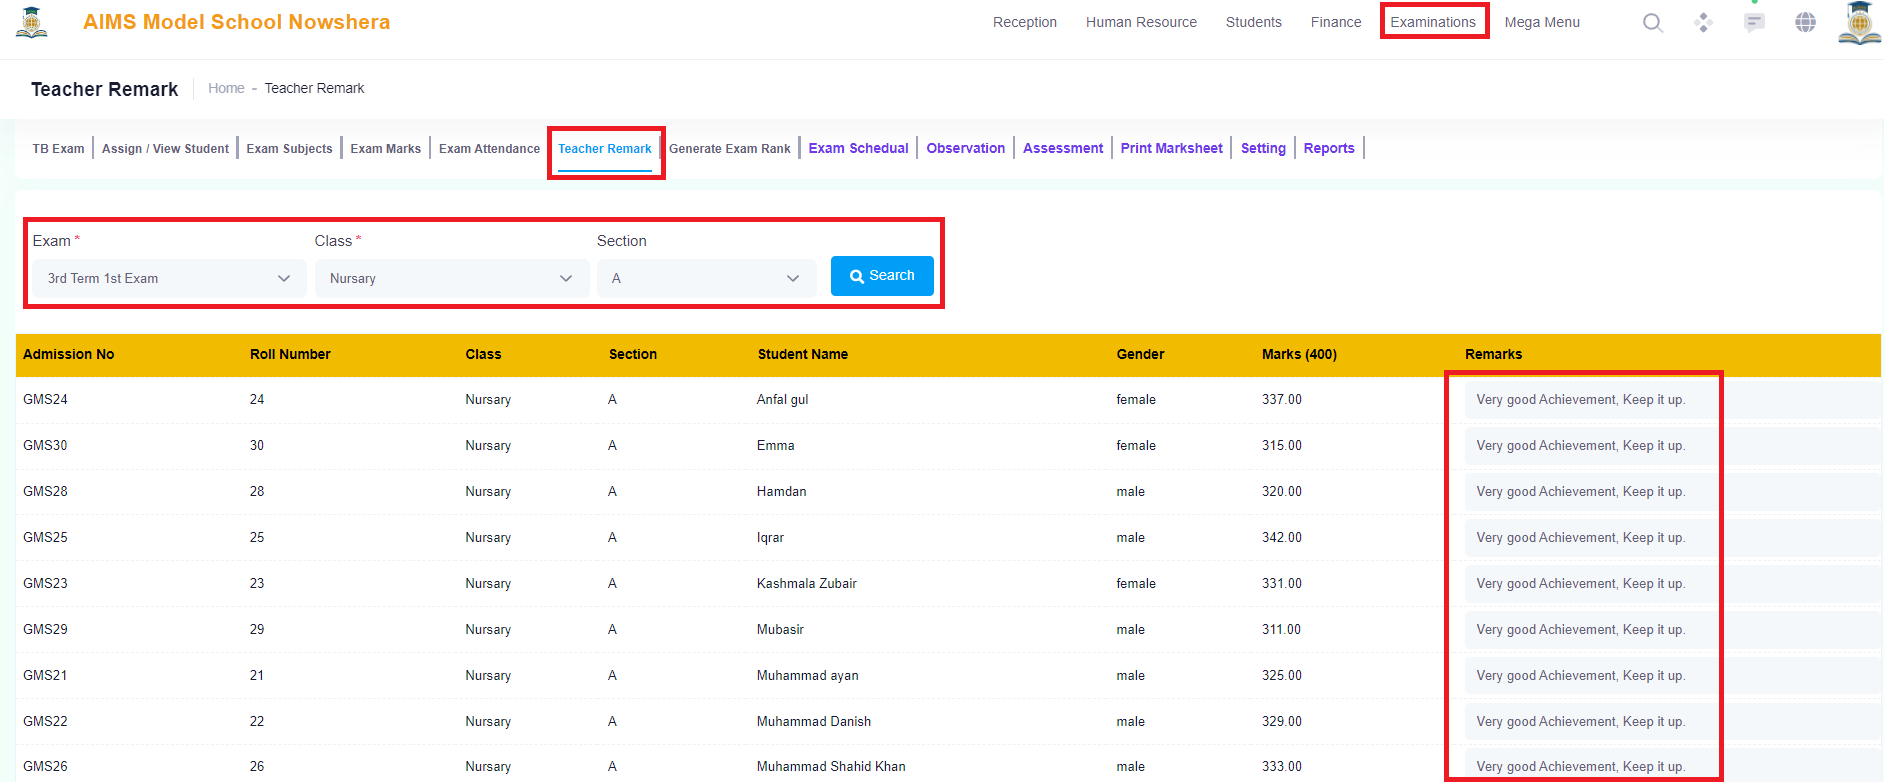
1. Click on the Teacher Remarks Tab to Add Teacher Remarks to the students of a particular Class and Section..
2. Select Exam from Drop Down,
3. Select Class,
4. Select Section, (Click Search Button and All the Assigned students list will appear, Then enter the Remarks according the Marks achieved in this examination in the relevant field).
5. Click on the Blue Save Button in the bottom to save the remarks.
6. The Entered remarks will be shown in the Student Exam Report Card accordingly.
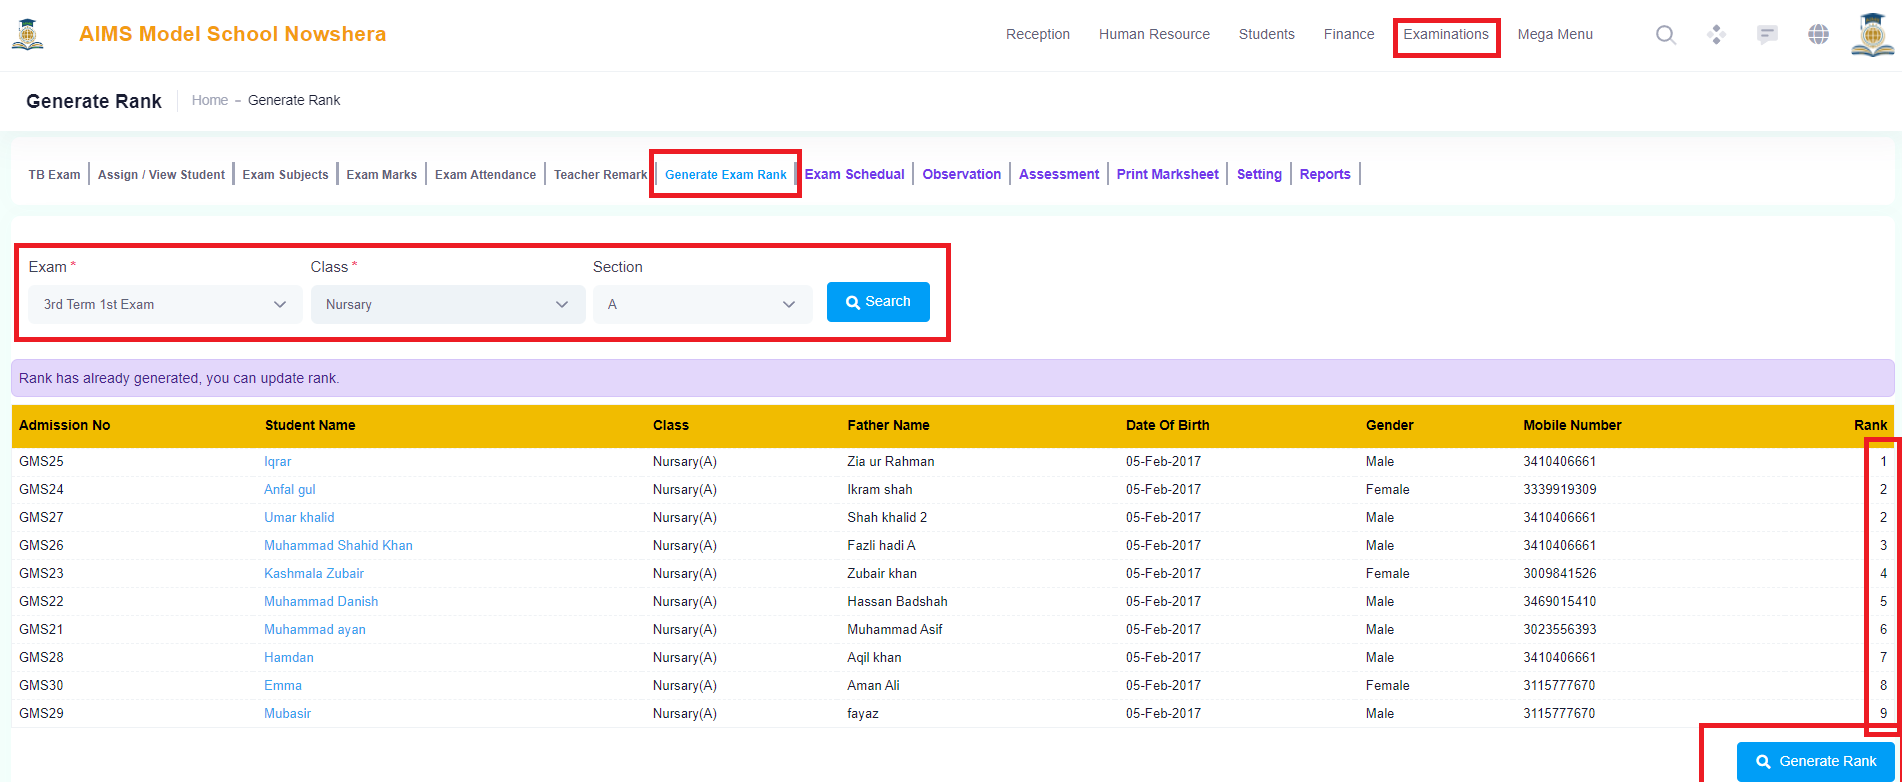
11.Generate Exam Ranks:
Click Examination in the Main Menu and Select TB Exam Management:
1. Click on Generate Exam Ranks Tab to generate ranks for the students of a particular Class and Section..
2. Select Exam from Drop Down,
3. Select Class,
4. Select Section, (Click Search Button and All the Assigned students list will appear, Then click on the big blue Generate Rank Button and the system will generate exam achieved rank for all students).
5. The ranks will be shown in the Student Exam Report Card accordingly.
12.Exam Schedule:
Click Examination in the Main Menu and Select TB Exam Management:

1. Click on Exam Schedule Tab to view and print for a particular Class and Section..
2. Select Exam from Drop Down,
3. Select Class,
4. Select Section, (Click Search Button and selected exam schedule will appear.
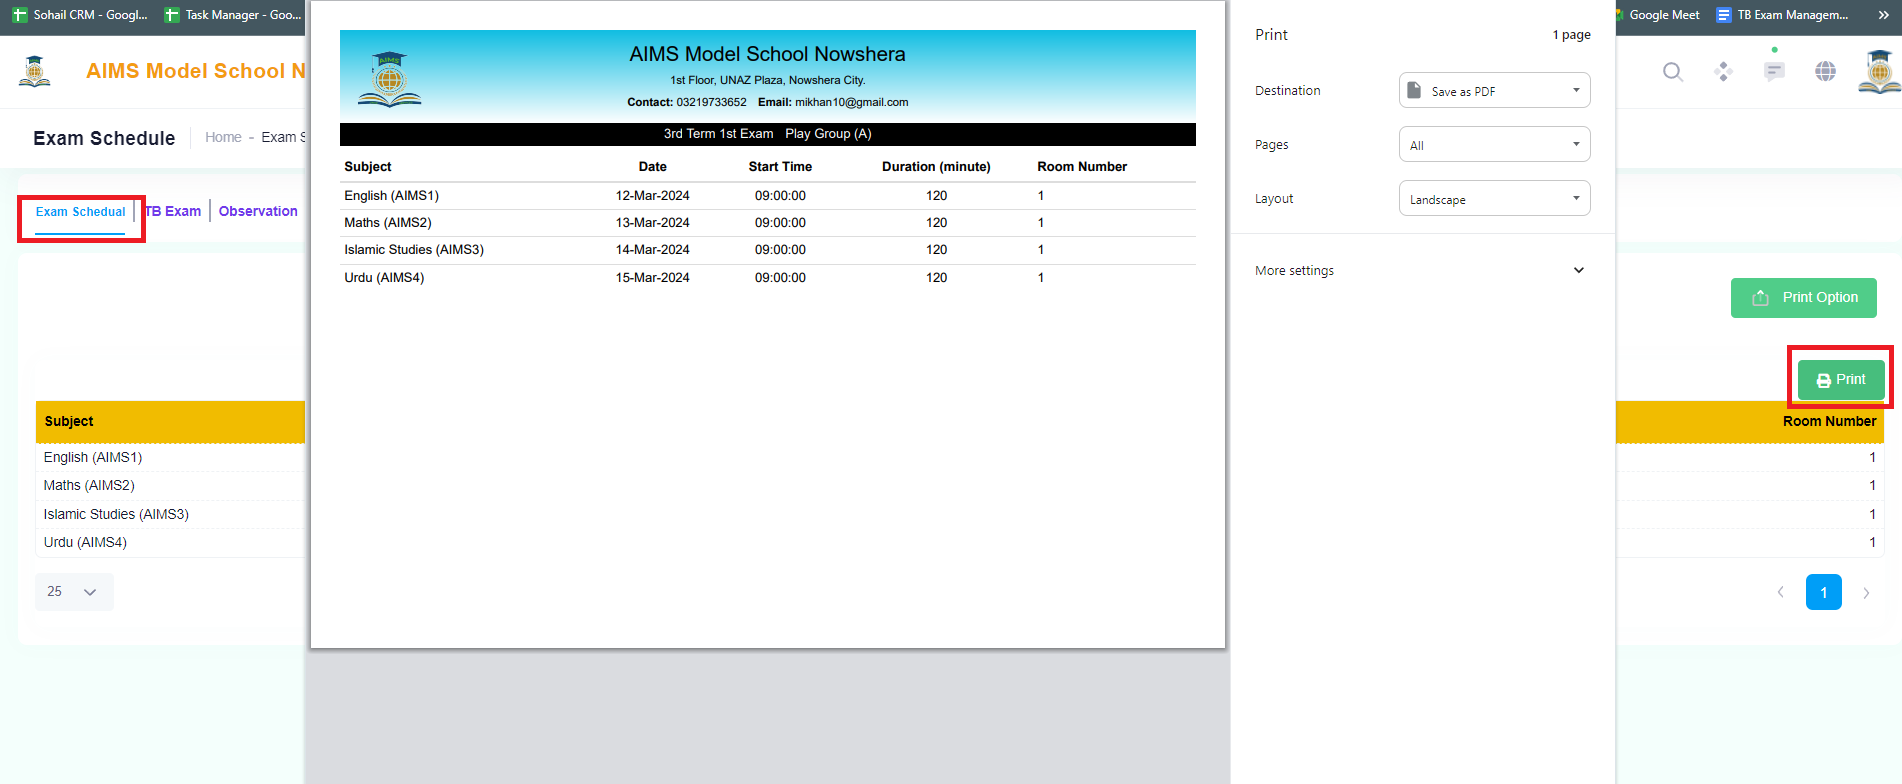
Click on the Print Options to print the Exam Schedule.
13.Add Printing Template:
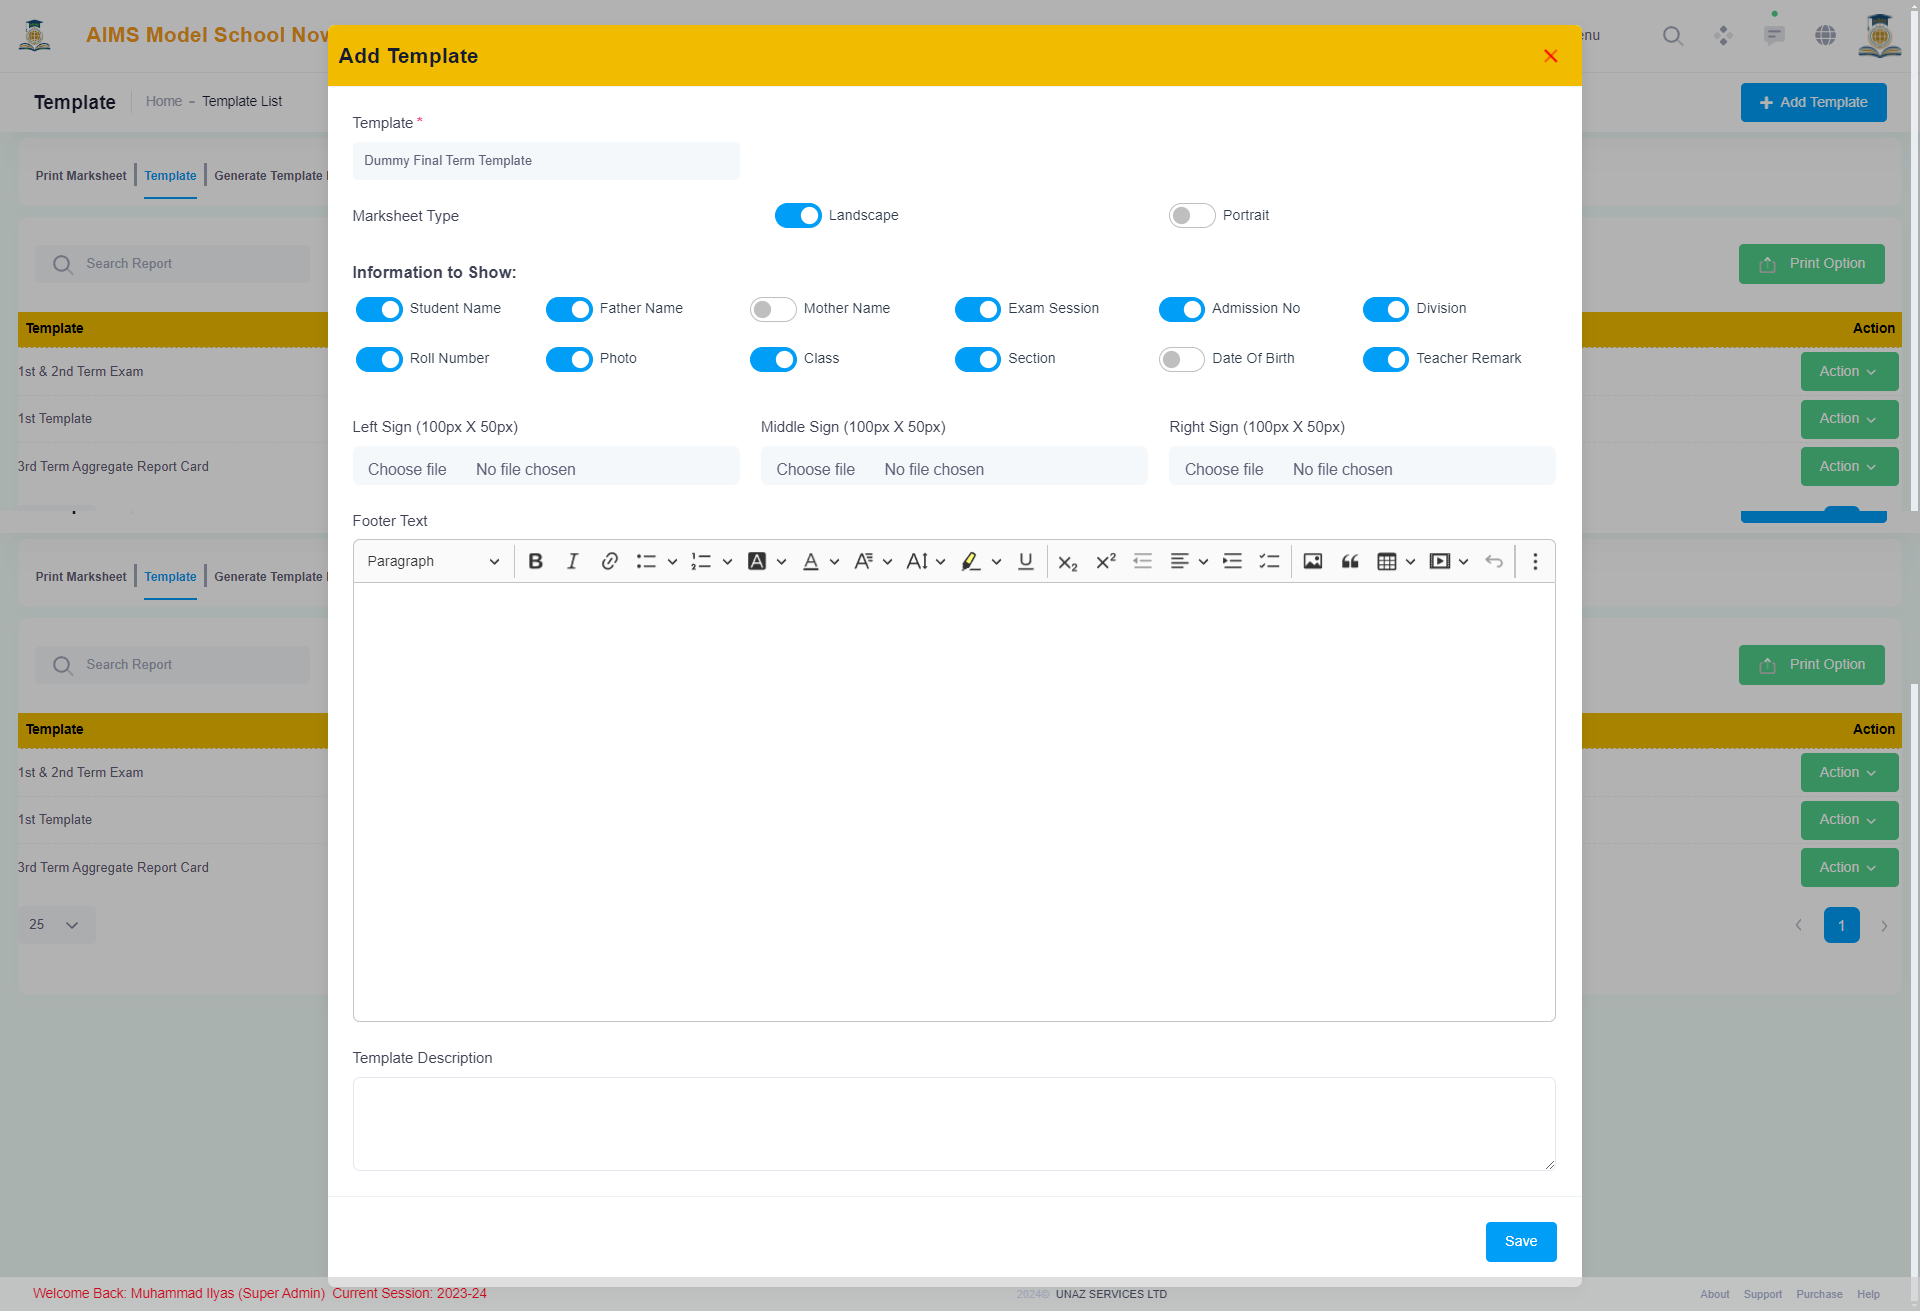
Click Examination in the Main Menu and Select Print Management:
1. Click on Template Tab to create a template for a particular exam with some selections.
2. Click on the Add Template Button in the right top corner and the template model will appear.
3. Select and enter all the relevant information as required.
Template View:
Click on the Actions in the template listings and then click on View to view the template.
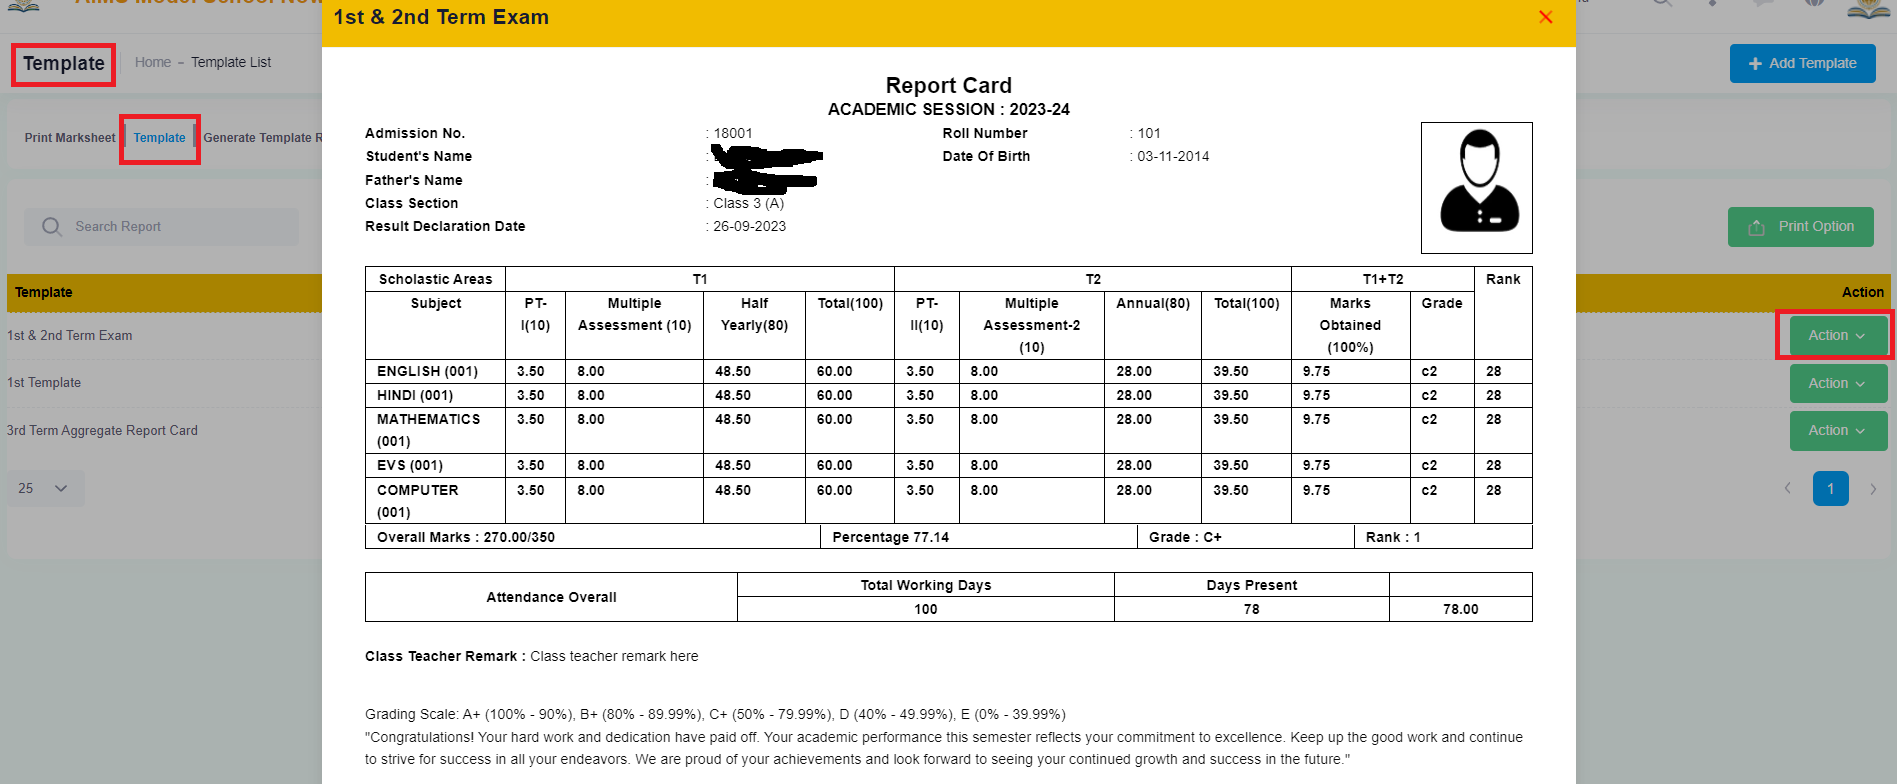
After Creating the Template, Now we need to Link our Exams to the Template to produce the desired Report Cards for the Student showing the results on the basis of linked exams.
Link Exam:
Click on Link Exams in the Action Green Button and the Following Screen will appear to link the exams.

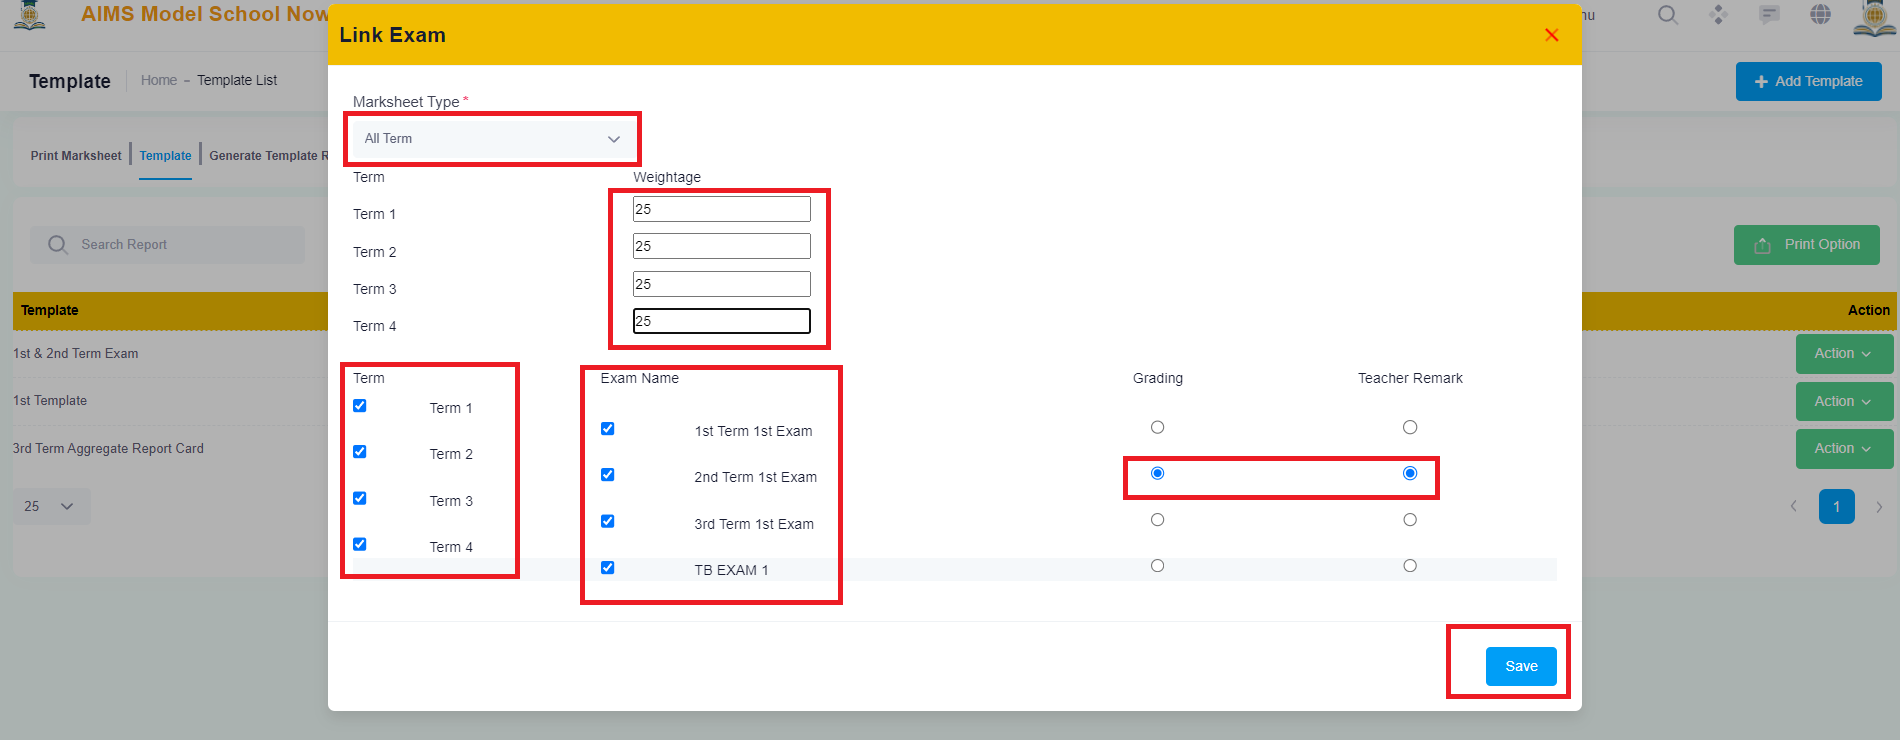
There are Four Options Available on the link exam screen.
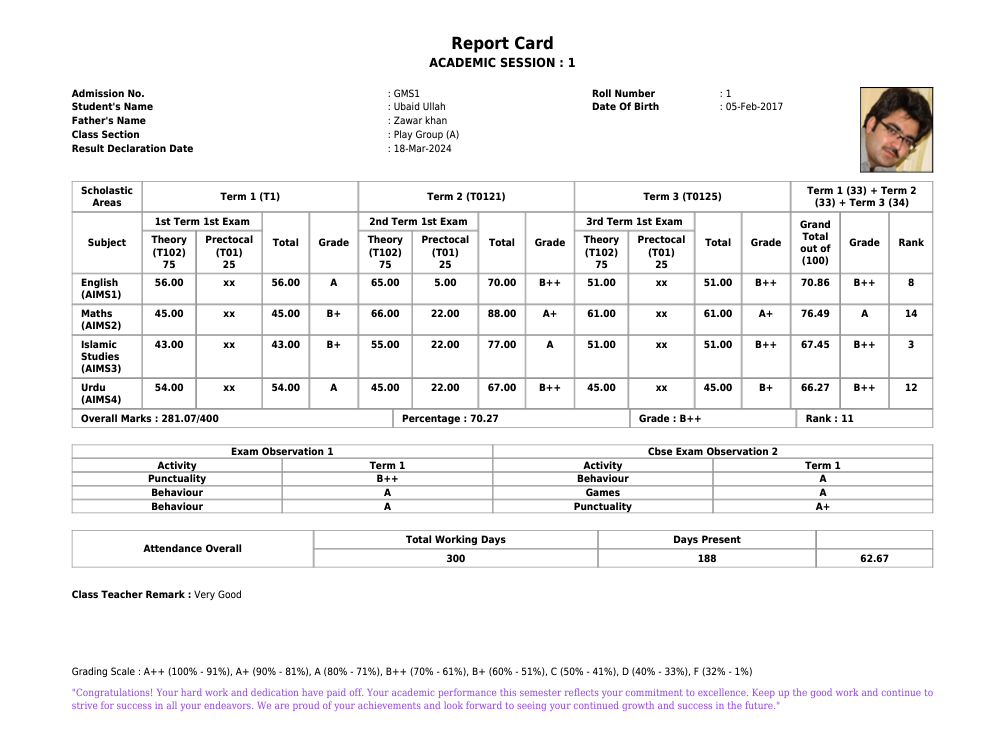
1. All Terms: To Link All Terms, Weightage needs to be divided on all Terms. Weightage must not exceed a total of 100. As it calculates overall results on the basis of 100%.
All Terms Report Card Print will preview as below:
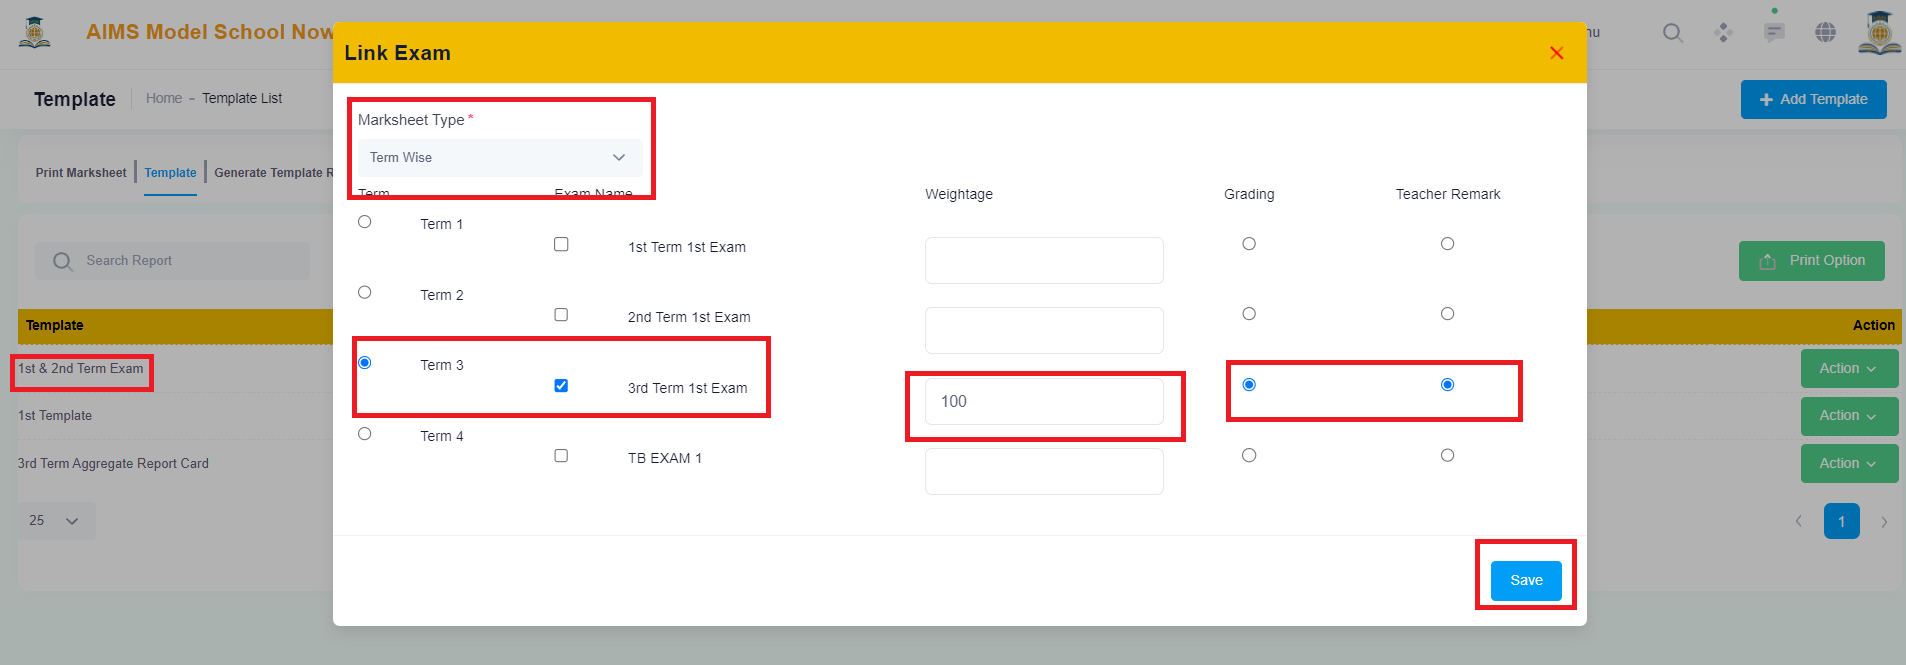
2. Term Wise Template
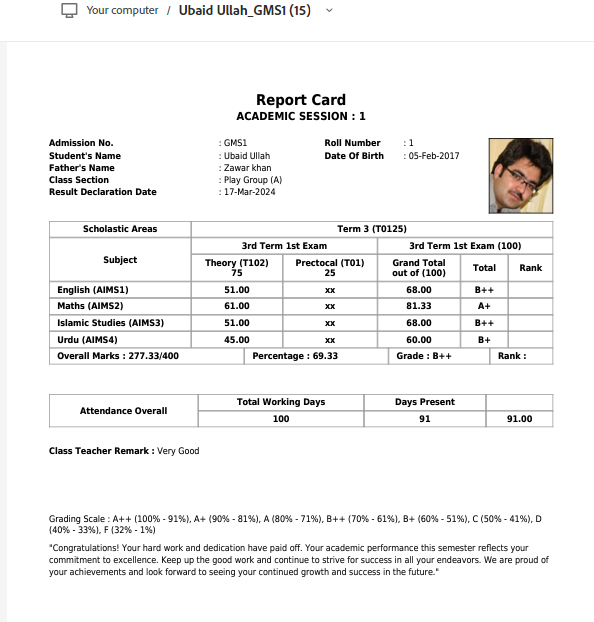
To Link All Term Wise Templates, Weightage must not exceed a total of 100. As it calculates overall results on the basis of 100%.
Mark Sheet Print for Term Wise Template selected.
3. Single Exam Without Term Template:
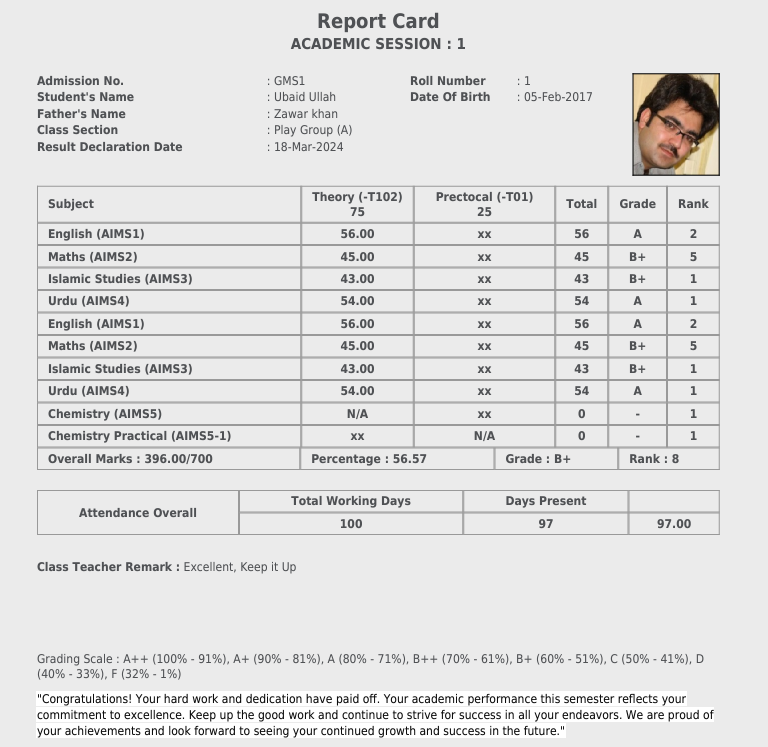
To Link Single Exam Without Term, There is no weightage in this single exam without term..

Mark Sheet Print for Single Exam Without Term Template selected.
4. Multiple Exams Without Term Template
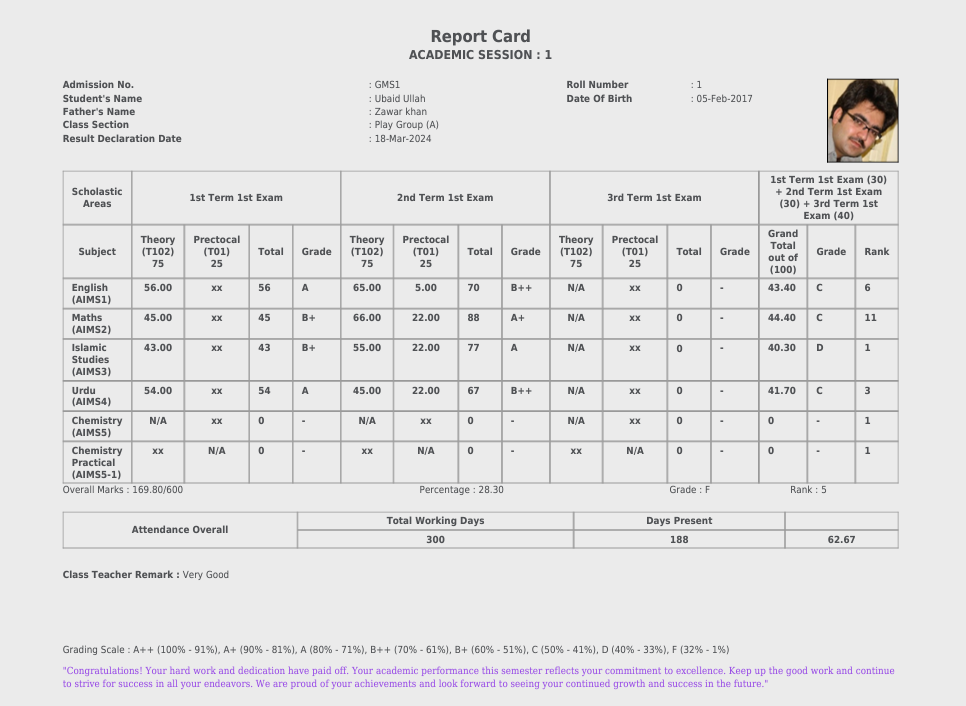
To Link Multiple Exams Without Terms, Weightage must not exceed a total of 100. As it calculates overall results on the basis of 100%.
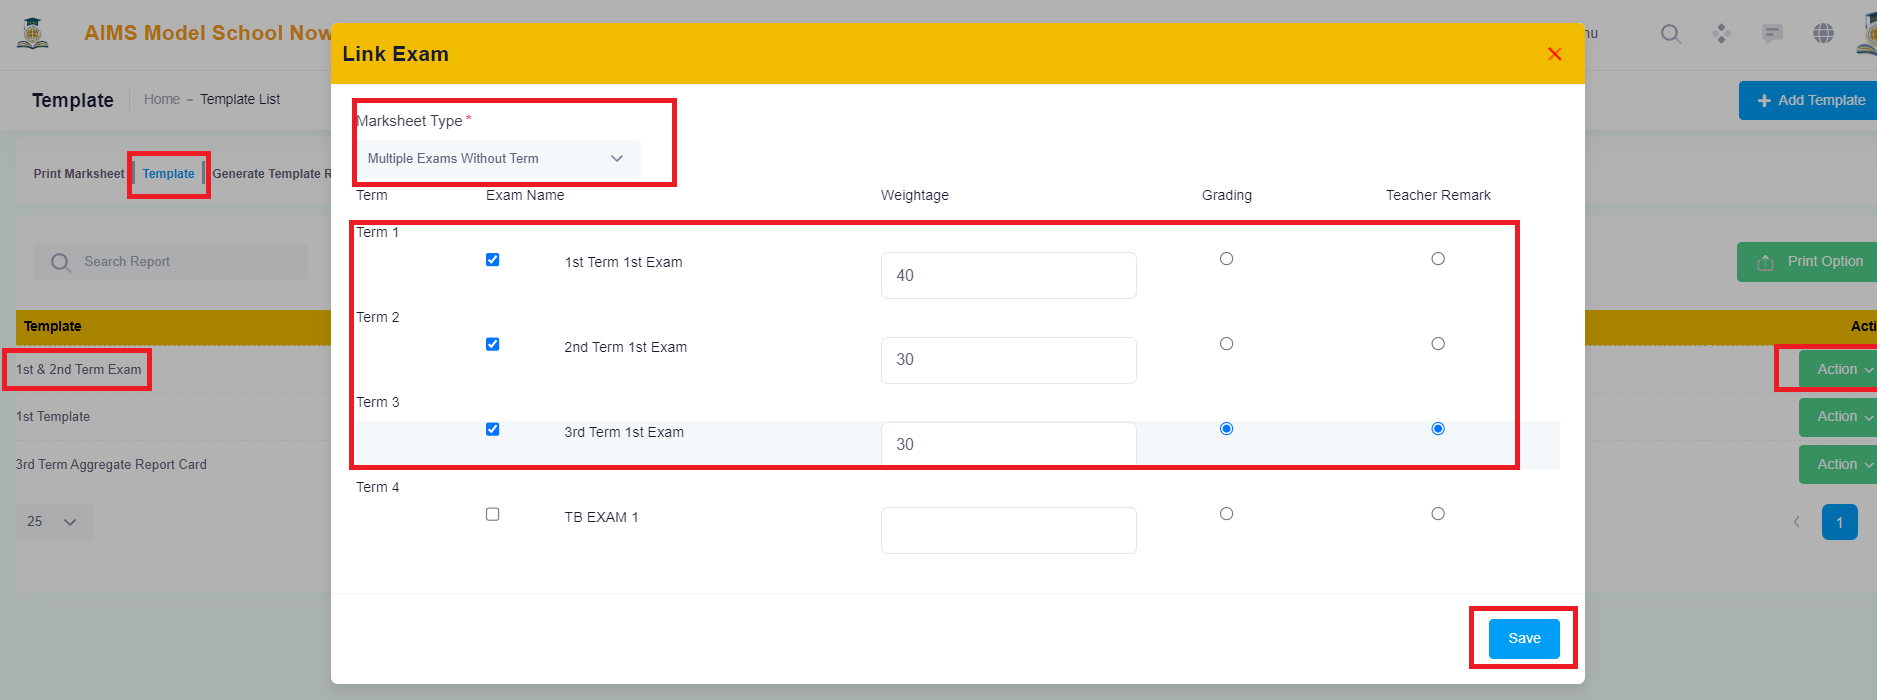
Mark Sheet Print for Multiple Exams Without Terms Template selected.
Note: (Template Rank must be generated for each template and each exam if you want to show in Report Cards).
14.Reports:
Click Examination in the Main Menu and Select Reports:
Click on Reports Tab to generate reports for a particular exam with some selections.
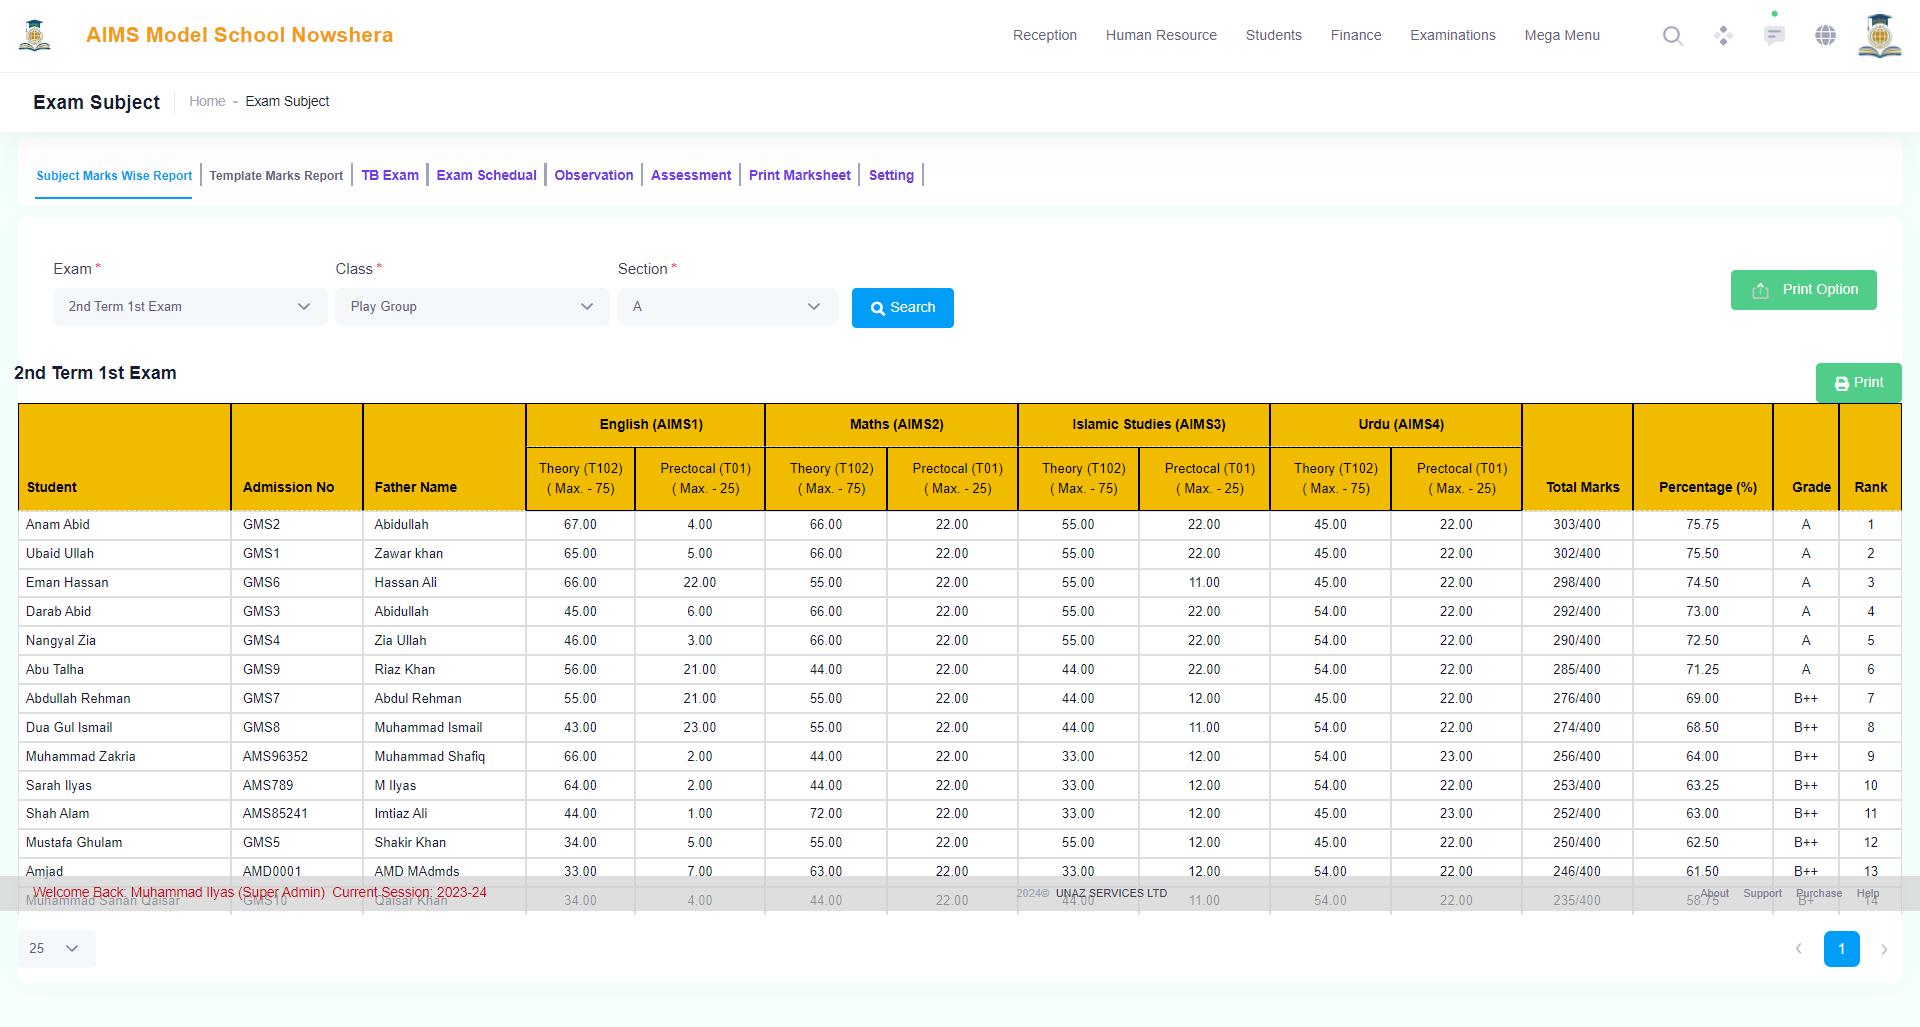
Subject Marks Wise Report:
1. Select Exam 2. Select Class 3. Select Section = Click on Search
Template Marks Report:
1. Select Template 2. Select Class 3. Select Section = Click on Search
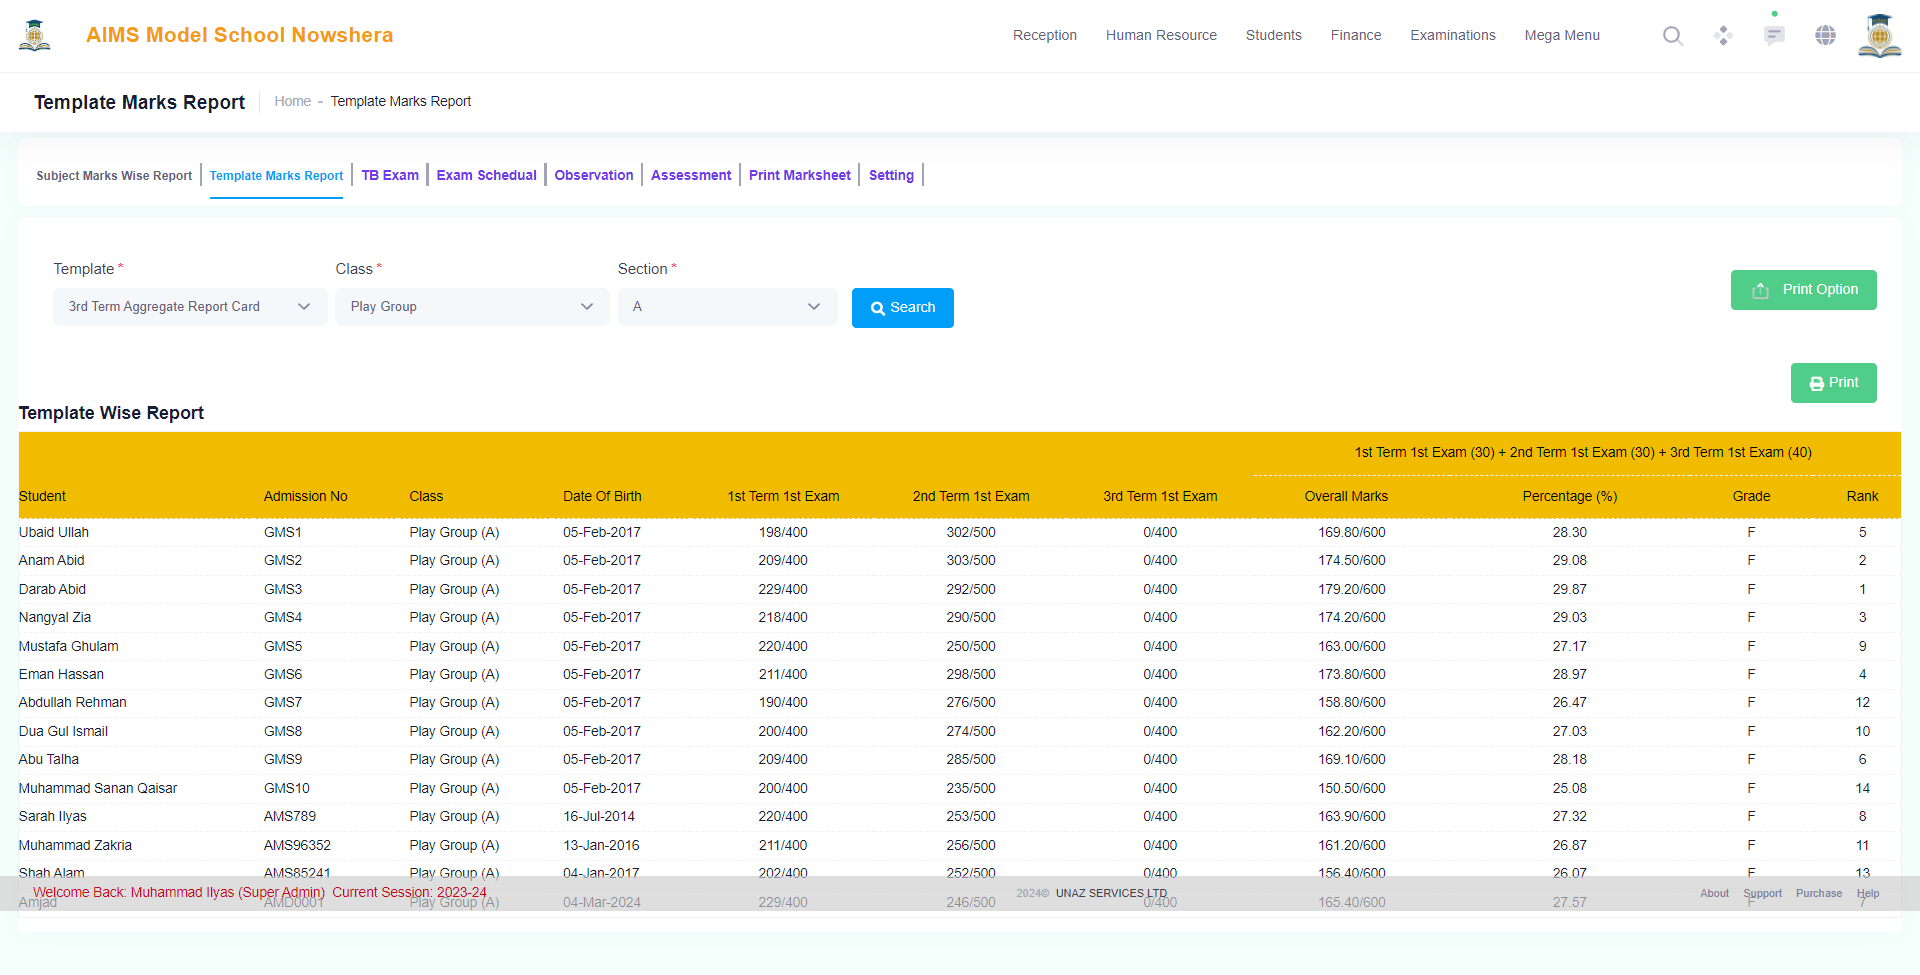
Click on the Print Green Button to print the report.
Hope this presentation might have cleared the whole process of Term Base Examination Management Process, But contact our dedicated support team at any time if further support is needed. Thanks
AIMS (Advanced Institutional Management System)
